This tip was sent by Graham Nutt.
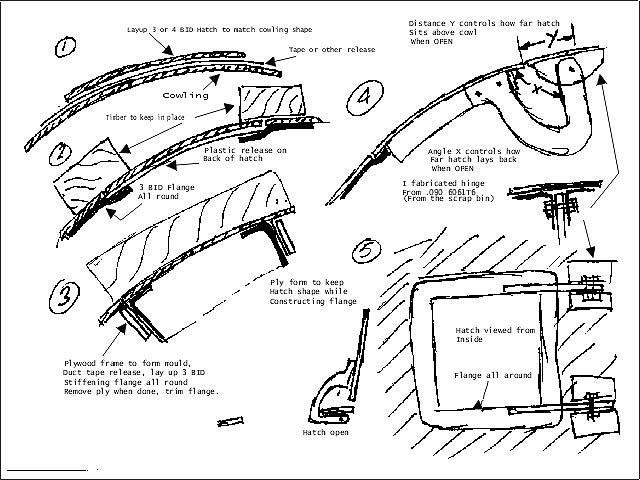 In my case I worked out the area I was going to use on my uncut cowl, laid some duct tape on the cowl and laid up a 3 BID hatch larger than the required area. This will duplicate all the curvature of the cowl very nicely. Then I put some reference lines across it and the cowl in both directions so that I could relocate it on the cowl after trimming it. If you already have a hole cut out you could cover it with some thin plywood or thick card to duplicate the cowl shape. Trim to the size you want with neat round corners etc, relocate on cowl using reference lines, mark cutout in cowl and carefully cut out to maintain a nice uniform gap around it. If you slip up you can backfill it later. I generally aim for about .030 gap (piece of cardboard I have at .025 + .005 duct tape). Not precision, but I have a thing about uniform gaps.
- Lay duct tape on the inside of the hatch, temporarily hold the hatch in place with small pieces of timber either bondoed or super glued (very small tacks). Longer pieces of timber that are roughly profile cut going right over the hatch and extending over both sides bondoed in place works OK (see sketch). All we are really trying to do is keep the outside of the hatch flush with the outside of the cowl while we lay up the sealing flange on the inside. Note that you should also be keeping the cowl the correct shape while you are doing this or nothing will ever fit. I used profiled ply outside the area, again bondo’d in place while the cowl was on to keep the area in shape.
- I laid up 3 BID flange going on to the cowl 1″ and extending 1/2″ or more over the hatch (with duct tape applied!!). After it was cured I released the hatch and trimmed the resulting flange to about 1/4″.
- Now we have to reinforce the hatch, which will also create the hinge-mounting flange. Remove the duct tape from the hatch and make sure we remove the resultant sticky residue. Some bracing stuck on the outside of the hatch is in order to keep the right shape because we are now going to work on the hatch without the benefit of the cowl to support it.
- What we are trying to do now is create a flange at right angles to the hatch to stiffen it. I made a frame out of ply so that the INSIDE edge of the ply was about 1/2″ inside the edge of the hatch. This would become the mould for the OUTSIDE of the flange. Lay some duct tape around the inside of this frame, tack it in place and lay up a 3 BID flange about 3/4″ up the ply and 1/2″ or so across the hatch. This will be trimmed later.
- Get some pieces of .090 Aluminum, don’t cut hinge profile yet but make one edge so it sits nicely across the hatch and the cowl. Drill the mounting screws to attach to the hatch, more duct tape on the hinge material where it goes across the cowl and lay up an angle flange each side of the hinge. This will become the pivot point bracket. You could then locate the pivot point and drill through. These glass brackets and the stiffening flange around the hatch can now be trimmed to size. I did it this way to make sure everything lined up when finished!!
- Cut out the hinge to the sort of shape on the drawings. I made some cardboard shapes to get it right first. Note that the inside radius must clear the edge of the cowl through the whole movement and the angle (X) will control how far the hatch lays back when open. The pivot setback distance (Y) controls the hatch edge clearance when it is OPEN.
Simple – no screws visible. It actually took much less time than it appears to do this and looks great. We also did this on a friend’s RV4 cowl. Where the hatch intersected the cowl, the cowl had an abrupt direction change out onto the cylinder fairing. This was a great attention grabber – “How did you do that!?”
The next trick is to hide the catch. Basically we are going to get some hinge pin material, stainless wire or whatever and some K&S tubing from the hobby store to fit the wire (comes in aluminum or brass – I prefer brass!).
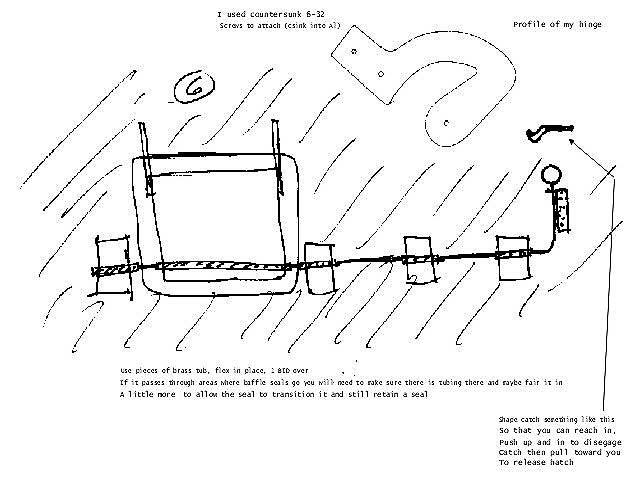 As in the drawing we will bond some tubing to the hatch, the cowl each side of the hatch and a few pieces forward of this using the wire to line them up. 1 ply BID over them will help keep them there (make sure there is some sort of release agent on the wire!!!). What we are aiming to do is to reach inside the cooling inlet, push the angled piece at the front slightly rearward to disengage it, rotate it away from the catch, and pull forward until wire disengages from the hatch. Some sort of stop is useful to limit the distance you can pull. Perhaps a collar on the shaft (hobby shop again). My hatch ended up slightly preloaded by the paint on the flange so it pops up enough to lift with a finger. You could use a little spring around one of the hinge pivots (or just glassed to the cowl) loading up the back of the hinge to bias it open. Again a visit to the hobby shop will yield some very light spring steel wire to make one. You even get 3′ so you can make prototype A,B,C,..
Hints to those who may not be glass oriented
To lay up items and keep them under control (such as the initial hatch layup, stiffening etc which otherwise become very fiddly and messy) we need to do the following:
- Get some plastic film that won’t melt with resin.
- Mark the shape you want on the back side of the plastic with a marker pen.
- Layup appropriate # of BID on the other side of plastic (otherwise marker disappears!). I always paint resin, lay cloth, paint resin, lay cloth so that we bring resin up through the cloth rather than trying to force it down.
- Lay another layer of plastic on top, squeegee or roll excess out of layup and trim to marker line using rotary cutter.
- Peel the unmarked layer, place layup where required then remove other layer. Gently work with brush where necessary.
Using this technique it becomes very easy to do all sorts of complex things with glass (like the hinge mounts and reinforcing flanges in this exercise.)
Hope all of this is useful to someone. It certainly looks great when done!
Note that most anywhere I needed a release agent I have just used duct tape (this was with epoxy resin – maybe you need to add some PVA release with other resins). On surfaces with not too much compound curvature contact or shelf paper works fine too.


