This builder tip was submitted by Barry Bieber, Glasair II-S RG
You know the rounded ends of the elevator and stabilizer shearwebs—the sections you cut off per the manual? Don’t throw them out! They are a good start for a teardrop fairing on the belly panel and on the forward fuselage for the quick drains! You’ll need to work out the front contour and shape, but the rear of the teardrop shape is almost perfect, and right out of the trash can!
 More about recessing fuel drain valves. I threaded the valves directly into the wing without any plumbing to get the drain valve to extend below the belly panel (see Sketch). The reason? To extend the valve below the belly panel requires an extension of approximately 2-1/2″ – 3″.
That is quite a long lever! In the event of an accidental hit when mounting or removing the belly panel or a wheels-up landing, should it ever be necessary (that’s a horrible thought), this extended piece of plumbing could break off flush with the bottom wing skin or, worse yet, break loose the aluminum insert installed inside the lower wing panel.
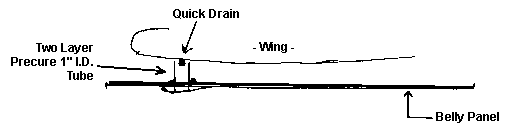
One concern if you leave the valve recessed: what if the valve gets a piece of dirt or something in it and starts slowly dripping? They do that from time to time. The cure would be to bond a 2-layer pre-cure tube 1″ in diameter to the belly panel, extending up to within about 1/4″ of the wing, as shown in Figure 4. The drain valve would then be located below the top of the pre-cure tube, and the tube would not allow fuel to drip into the belly panel. Should the wheels-up thing I mentioned ever be necessary, the 2-layer tube is soft enough to not do any damage.
So how do you sample fuel with these fuel drains, when they are recessed? You will have a hard time trying to sample fuel without getting a fuel-soaked hand and arm. Use your standard fuel sample tube-you know, the 1″ diameter, 8″ long plastic tube, the one with a screwdriver on the bottom. I think it’s a great tool for sampling fuel only! Anyway, remove the plastic insert with the probe that sticks out and throw it away. Then purchase a 6″ piece of 6000-6 hose from S-R, take the hose and stick it into the plastic tube; it will wedge itself in the tube about halfway down, leaving approximately 3″ protruding out the top.
Voilà! The hose fits nicely in the recess hole, and with a good straight cut on the top, it allows you to push up, sample the fuel, and not touch the paint or get a wet hand.


