This builder tip was submitted by Barry Bieber, Glasair II-S RG
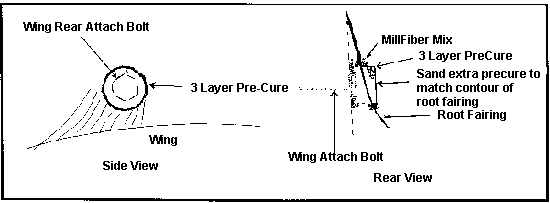
Here’s the method I used to trim in the area around the rear wing-attach bolt.
First, fit the root fairing per the manual. Prior to bonding the fairing in place, locate and drill a hole in the fairing for the rear attach bolt. Size is not critical, but I recommend starting with a 3/8″ hole. Then sand the primer off the fuselage around the attach bolt area and bond the fairing in place.
Get a piece of 3/4″ O.D. aluminum tubing off your shelf and wax it up. Apply a 3-layer wrap around the tube, 3″ long is plenty. You will need pliers to break it free after it cures.
Enlarge the hole in the wing root fairing to insert the 3-layer tube and sand the inboard end of the tube to fit flush against the fuselage side. Install the wing-attach bolt and place a 7/16″ socket on the bolt. Use the socket to center and position the 3-layer tube.
After the fitting is complete, apply mill fiber to the tube at the inboard end and the areas that contact the root fairing. Allow the mill fiber to cure, and then sand the outboard end of the 3-layer tube to match the root fairing contour, as shown in the sketch.
 Note: The recommended 3/4″ I.D. pre-cure tube gives clearance for a 7/16″ socket even after primer and paint.


