Written by Mike Palmer, Glasair I/II FT.
We’ve been flying almost two years now in our Glasair I I/II FT (it’s part Glasair I and part Glasair II). With 400+ hours on the tach, we’ve had time to look back over our experiences since we’ve been flying, and re-evaluate some choices we made while building. There are still lots of things to learn, and I’m constantly amazed at the new ideas I’ve gotten from other Glasair owners. Truly, as I’d been told, “the project is never finished.” Here are some hints I’ve jotted down while in the cockpit that have come from our and their experience.
From Glenn Lawler: shown in figure 1 is a rubber-ish product that makes an excellent wing protector and wing walk mat. It has a loose “weave” and is very lightweight. It’s really for router tables to keep your work from slipping, but it grabs well enough on a freshly waxed wing to keep you from slipping! It’s available in the tool department at Home Depot-type stores (or Lowe’s, in the southeast).
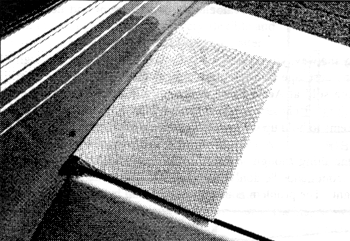
We cut ours in two, and use one for each side of the fuselage. I’ve also found it makes an excellent tool mat for when I work on the plane. I told Inge that after we painted the plane, I’d never lay a tool on the fuselage, but that violates the homebuilder’s rule that says, “a horizontal surface is soon piled up.” The mat not only offers protection against scratches, but keeps things from rolling off the fuselage. When dirty, simply put it in the washing machine. As a bonus, ours came in a gray color that matches our interior!
This from Lynn Detlor, who also heard it from the S-H factory: vinyl ester resin doesn’t completely cure unless you heat it. And when you heat it to the final cure, it shrinks. You’ve probably noticed this effect. You sand your cowl perfectly smooth, shoot a beautiful coat of paint over it, and then fly for a few hours. You come back and now notice the weave of the glass ever-so-slightly showing through. Obviously, not a safety issue, as we’re all flying Glasairs that haven’t been completely cured in a giant autoclave.
But one thing you might want to check after you’ve been flying for a year is the torque on the engine mount-to-fuselage bolts that pass through the firewall. I’ve been surprised to find how hot that firewall gets after a few hours. I should really test this with temp dots, but I think the firewall corners can reach the temperature of the oil (180°) after a four or five hour flight. This is the curing temperature for our resin, and at Lynn’s suggestion, we checked the torque on our bolts after a year-and-a-half of flying. He warned us, but we were still surprised to find we could get almost a full turn on the bolts to bring them back up to torque.
Speaking of hot firewalls, our avionics fan is located a few inches away from the firewall on the firewall rib. I noticed one day after three hours of flying how warm my toes were getting (I fly in stocking feet). I felt the radios, and they were burning up. I put a temp probe on the output of the avionics fan and found I was pumping 120° air into the avionics! (OAT was about 90°.) In my case, I couldn’t find a better location for the fan, so I ended up attaching some SCAT hose and piping air into the fan from further aft in the fuselage. That helped some, but in spite of what I wrote a few years ago, I also drilled a hole in the top of one of the side NACA ducts to pipe a little outside air into the SCAT. (The concern is moisture getting into the radios. But it’s an uphill run on the elbow, so hopefully, it will act as a trap.) That doesn’t pipe as much air as I thought it would, but this brought the output temp of the avionics fan closer to ambient.
Installing kick panels in your airplane only exacerbates this heat problem, so don’t seal off the stack more than you have to. (You do have giant ventilation holes in the top of your glareshield, right?) I also just recently installed a fiberglass quilt-like insulating material on the firewall, which also helps a bit. Given the amount of room you Glasair Super II and III builders have up there, I’d suggest mounting the avionics fan on the fuselage sidewall where it will stay cooler.
Same comment if you mount your voltage regulator inside the airplane. These things fade with heat, and should be mounted on a metal plate attached to the side wall of the fuselage to keep them cool.
More on heat: we have a four-probe CHT/EGT system. Cylinder #2 has always been the hottest on climb, sometimes showing 450° when the others are at only 400°. Interestingly, #4 ran coolest on climb, and the spread seemed to increase with angle of climb. This got me thinking that maybe the air, being rotated by the prop, was flowing over #2 on climb-out and onto #4. (See Figure 1 and note we have ramped cowl inlets, an idea borrowed from John Levy.) So I bonded a simple deflector to the top cowl just behind #2. (It’s just a 2″ strip of fiberglass that I laid up on the upper cowl, using angle aluminum to glass against.) The deflector is angled 45° down toward the inter-cylinder baffle. It worked! Now the two cylinders run more evenly, and I just barely touch 425° on #2.
We thought we we’re being clever, buying a combination heated pitot/static tube. (There’s only one brand around, apparently used on Vikings.) I think someone else has mentioned this before, but don’t use this style. Stick with the style sold in the S-H Options Catalog, which uses a separate, remote static port on the fuselage. The problem with the combo unit is that the static port isn’t really seeing static air, being so close to the wing and all, and even with the little tricks we use (a tie wrap behind the static port holes to change the pressure), the device is airspeed and angle-of-attack sensitive. In our case, we’re 100 feet low on the ILS at speed. Not good. Another builder fought a battle with a two-axis autopilot that used a solid state pressure sensor that wouldn’t hold altitude. It’d oscillate 100 feet around the target altitude. The problem was finally solved by changing to the separate, fuselage-mounted static port.
Ever trying to eke out a few more knots, I heard that the perpendicular jet of air that escapes between the aileron and flap gap can slow you down. Ideally, one would make this a tight gap, but if you mindlessly follow the directions in the Glasair manual (which is generally the best thing to do if you don’t know what you’re doing!), you’ll end up with bigger end gaps than are required. Because of the geometry of the hinges, the flaps and ailerons swing a “funny” arc. However, when we cut the flaps and ailerons, we ignore this fact and make the ends of each perpendicular to the bottom of the control surface. (See Figure 2.) But because of the way the ailerons swing, this is not ideal. If it’s not too late, when you fit up the flaps and ailerons, watch how they move relative to each other, and angle the end caps as necessary to get the tightest fit possible—without interference, of course.
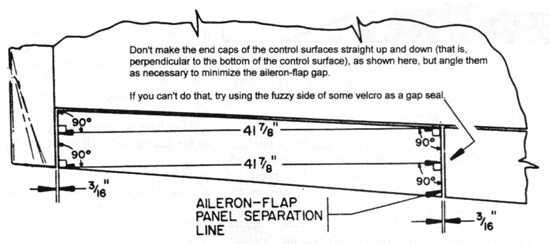
However, if it is too late, as it is with us, you might try this: I took the fuzzy side of some self-stick Velcro, cut it, and stuck it to each side of the aileron end caps. It’s thick enough to fill the gap when the aileron is neutral and forgiving enough to crush when the clearances tighten (as when the flaps are down.) I only just flew it the other day—think I gained a few knots. Instead of Velcro, I suppose the more industrious of you could route a groove in your end caps and install some soft rubber material, making something like a windshield wiper to seal the gap. Wonder if there’s anything to gain by sealing the gap between the elevator counterweight arm and horizontal stab?
By the way, you have taped your flap/aileron wing gap, right? The best tape I’ve found for this so far is a 3M brand plastic tape sold at Ace hardware stores. It comes in a variety of colors. I chose white, of course. It’s a plastic-based tape, seems to hold up well, and the adhesive is forgiving.
One thing though. If you’re going to seal your wing gap (recommended), don’t make the aileron/flap to wing gap too tight. The problem is that the tape has to bunch up a bit when the control surface moves full down. Our gap is so tight that the tape actually gets pinched and tears, and I have to replace the tape about every three months. Here, a slightly bigger gap is actually better.
We have a firewall-mounted battery (a gel cell, for what it’s worth). Heeding the advice of the Sky-Tech starter guy, I used #2 gauge wire to install the starter system, which implies that you have to use #2 gauge wire to ground the battery to the engine. (Weakest-link-in-the-chain thinking.) I found a deal at an airshow on some Navy surplus #2 gauge with swaged connectors and used that for both the positive and negative battery connections. This worked fine for a year, and then the battery quit.
The failure mode wasn’t what you might think, gel cell and all. The failure mode was that the negative (ground) terminal had cracked inside the battery. (If you pushed down on the battery terminal, everything worked fine.) The reason? The #2 gauge wire from the battery to the engine case was only about 8″ long. While somewhat flexible, the #2 gauge wire was still transmitting engine vibration to the battery, resulting in a fatigue crack at the terminal. (At least, that’s my theory.) So, after buying a new battery, I removed the #2 gauge ground wire and made a new ground cable using three lengths of 60 amp braid in parallel. The braid is very flexible and doesn’t transmit engine vibration to the battery.
Incidentally, we never had a problem with the gel cell (wheel chair battery), but from some temperature dots, I found that it would get quite hot (170°). (I suspect after engine shut down and subsequent heat soak.) I cut a tiny NACA scoop in the cowl near the battery and made an aluminum shroud to blow air on it. That helped temperatures a lot, although I do notice some oil film trailing out of the NACA after many flights, which indicated that, at least in cruise, this NACA is seeing less positive pressure than the inside of the cowl, and air is flowing out the NACA. Oh well, at least air is flowing and the battery is cooler.
This is going to sound obvious, but if you drag your brakes while taxiing an FT, you might blow a nyla-flow fitting or the o-ring in the caliper from heat. Carry a spare 3/16″ ferrule (from the hardware store) and o-ring around with you. Their weight is negligible. (Some Long-EZ builders are cutting vent holes in the tops of their wheel fairings.)
Related to this: if you need to tow your airplane after blowing an o-ring, make sure that the person driving the truck drives very slowly! In our case, the fellow was in a bit of a rush, being the only one on the field. If your CG is somewhat aft, as ours is, and you’re full of fuel, you can get some mightily interesting fishtailing oscillations, which can quickly diverge and drive the prop into the back of the truck. (Fortunately, it was a wood prop (very forgiving) and damage was minimal.) This, too, will sound obvious, but if someone offers to help but has other commitments, wait for a better time.
Rudder pedal locations: if we were going to do it again, we’d mount the entire rudder pedal assembly for the FT about one inch higher than the manual suggests. I helped someone build their Super II RG and saw that the factory has moved the pedals up, so this may not be an issue on new Glasairs. But if you’re still building an older one, it’ll be a lot more comfortable with the pedals higher. Also, consider making some kind of heel rest down there. It really helps.
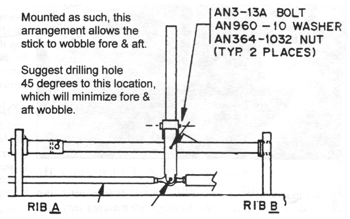
Control stick mounting mod: this is really nit picky, but instead of drilling the hole to capture the control stick as shown in the manual (see Figure 3), drill it 45° to the original direction. (Either that, or drill two holes 90° apart.) If you drill the hole as shown, there can be very slight fore-and-aft slop in the stick. Considering that fore-and-aft pressure is the most frequent input you’ll be using, you might like to get rid of the slop.
This has been said before, but if you plan to fly any IFR, bond your metal push/pull tubes to the engine ground. I wish I’d done this during construction, when it would’ve been easier. We’ve flown through some pretty charged air and gotten good and shocked when one hand is on the stick and the other is on the throttle. Not only will bonding eliminate the sparks, it might help minimize P-static.
Jim Weir wrote an article years ago about reducing P-static on fiberglass aircraft. After bonding all the metal pieces, hang one strand of a #22 gauge wire out the tail of your plane. The strand should be connected to your airplane ground through a 470K ohm resistor. He says it worked on a Varieze. Haven’t tried it yet. It’s still on my to-do list.
I’d previously written about hanging a vertical card compass from Velcro in an attempt to isolate it from engine vibration. You can additionally add a bit of weight in the form of a lead “tape weight” (used to balance mag wheels on some cars) in the compass housing. The tape weight is thin enough to fit in the housing and can be bent to fit. The weight has the effect of lowering the resonant frequency of the compass assembly.
If you can, stack your avionics together, sit in the airplane and make sure none of the knobs blocks any of your radio displays. Unfortunately for us, we mounted our LORAN above the DME, and a LORAN knob sticks our far enough to block the upper segment of the distance readout on the DME. The result is we have to scrunch to see whether we’re 17 or 11 miles out. (Makes a difference on an ILS!) Similarly, we mounted our Stormscope low in the panel, and it’s a little difficult to see the LCD screen in sunny conditions (which might prevail as you look into that wall of clouds 100 miles ahead.) Instead, we should’ve mounted our Stormscope up where the secondary NAV display is. (Might still be a little bit of an issue with the StrikeFinder, even though it uses a different display. The glare in the Glasair, with all the open canopy glass, is very strong.) Also, use shims to space your radios apart vertically while mounting during construction.
Maybe this is a function of CG and wingtips, but we really get some fishtailing in turbulence—so much so that the poor copilot/passenger, who can’t hold on to the stick and throttle like the pilot, feels helpless as he or she gets thrown around the cabin. We installed a “turbulence handle” , which helps a lot. Don’t know if it’s psychological, or if it really works, but it’s been a lot more comfortable in turbulence holding on to the handle. Passengers grab for it instinctively. We bought a cabinet handle from the local Home Depot, painted it, made some flanges, and mounted it when the upholstery was installed. (You could also mount it with screws through the fuselage, the way the wing brackets are attached.) If you use this hint, be sure to mount the handle on an angle that’s comfortable for the human hand (i.e., don’t mount it vertically).
Shelf life of gyros: we’ve had to overhaul both gyros (and that HSI ain’t cheap!) already. Both failed at about 350 hours. They sat on the shelf for about five years while we were building. An early Glasair News recommended flipping these things upside down every month, but you know how time flies and you forget to do that. I suggest putting your gyro purchase off as long as you can.
Did ya see my electronic hints article in the May 1997 issue of Kitplanes (Page 82)? They asked for more, so I plan to write about our push-button flap selector circuit, an inexpensive recognition light flasher and an inexpensive voice annunciator circuit in future issues.


