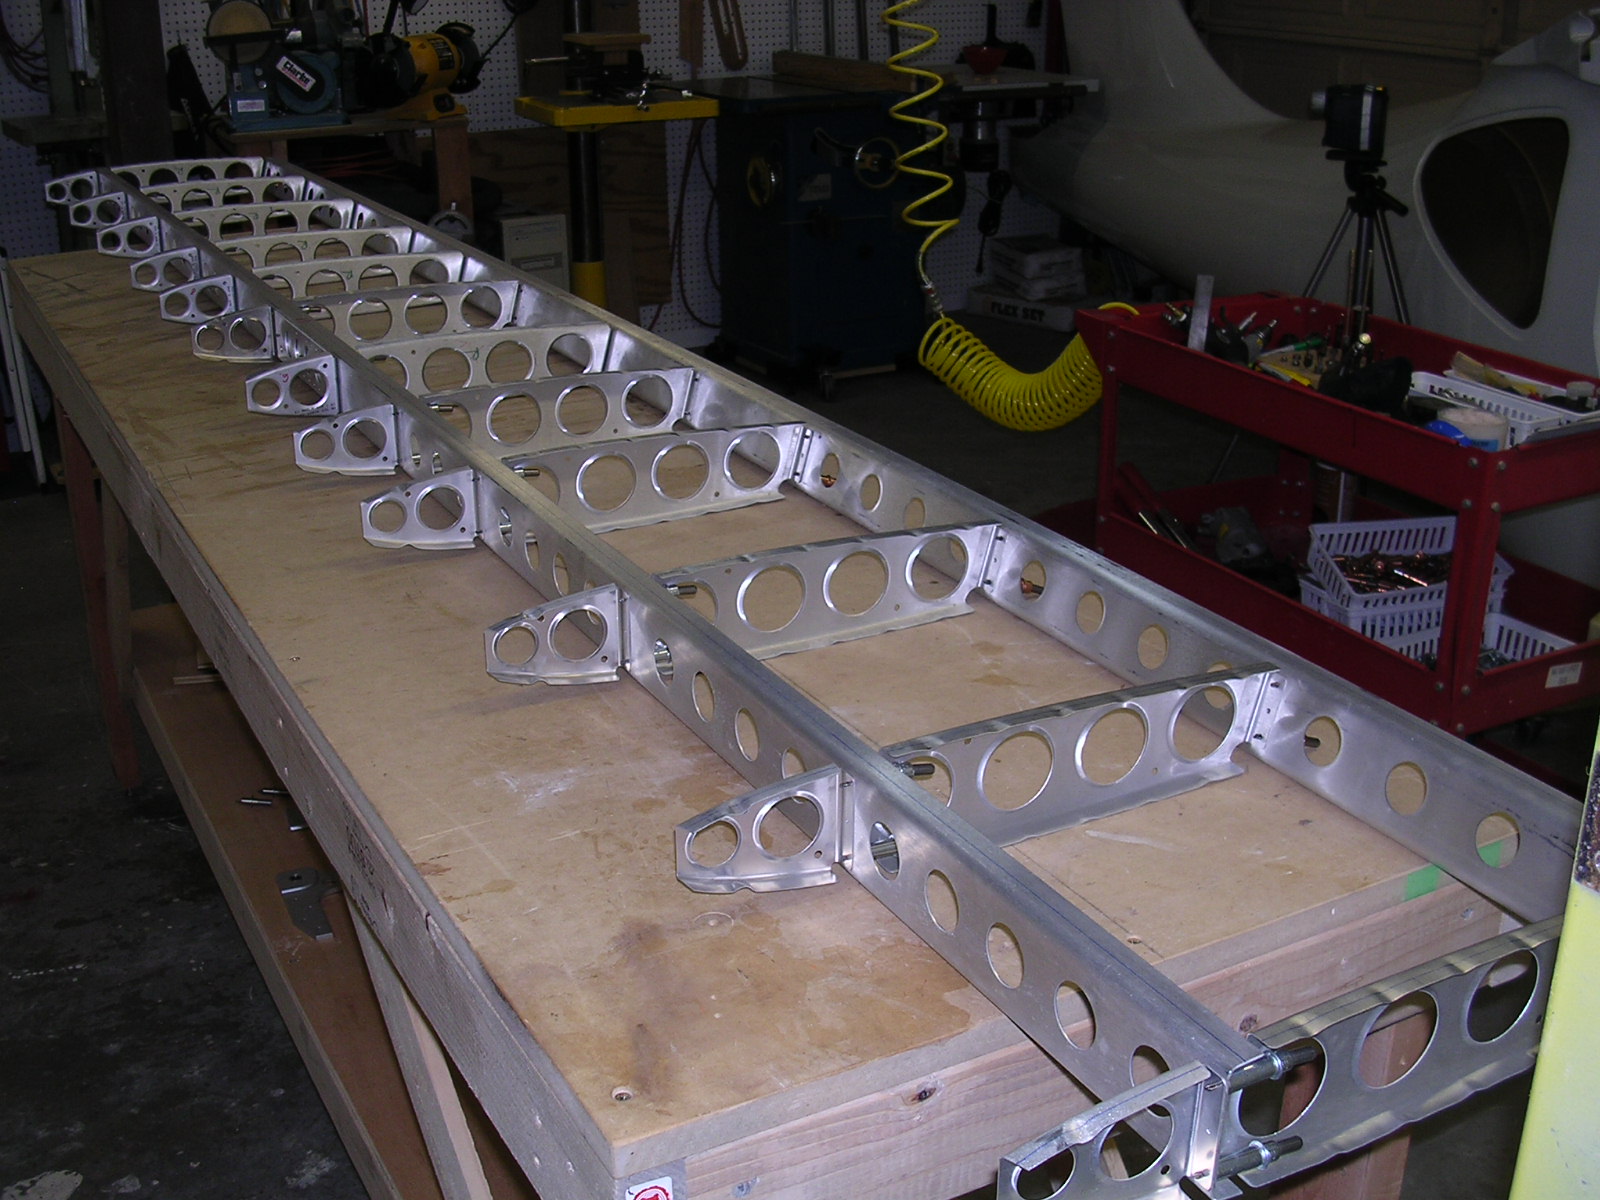
Building a horizontal stabilizer jig: We got the full kit Jan 2nd (1996). Got it home without incident. There was a key part on backorder for the rudder so we have started with the horizontal stabilizer. We built a jig like Sid suggested. We basically made the wing jig that they suggest in the manual. We built the full size wing jig and added a 4×4 support for the horizontal stabilizer. The idea being that we use the same jig for the wings and the horizontal stabilizer. The 4×4 support that we added is easily removed once the horizontal stabilizer is complete.
–Rhett Westerman
Horizontal stabilizer twist: Don’t panic if there is a small twist (3/8″ – ½”) in your horizontal stab/elevator. Both mine and the factory prototype have them and they fly fine.
–Jim Londo
Aligning trailing edges: For aligning trailing edges of stabilizer, elevator, ailerons, flaps. Use padded spring clamps to hold skin together. Sight down along skin edge, through the space in the clamps to provide eye-sight visual straight alignment. You can get it very close to perfectly straight by tiny adjustments in the clamps and pushing & pulling the skins to allow for slippage. (All before drilling the trailing edges of course).
–Paul Hansen
Dents caused by nose ribs: I called S-H on fitting the HS skin, they said it was okay to grind down the nose ribs to get the skin to fit. Well, I did that and it helped somewhat. The problem is the skin can get pulled further back along the spars and it is still possible to get dings in the leading edge. So, if the nose ribs are ground down you must be very careful on the spar-skin lineup. I ended up being very close to the edge of the aft spar on my rivet line.
–Kevin Gabriel
Keeping the horizontal stabilizer straight and warp free: I used a flat, level table the length of the stabilizer. Along the long edge of the table I clamped three 3″ long pieces of 1″x1″ angle iron, one at each end and one in the middle with the flat side facing toward the table. Using a length of string pulled tight, I aligned the angle pieces in a straight line. I then placed the lower trailing edge of the aft spar against the angle iron and clamped it to the table at each end and the middle.
I followed the instructions up to where the skins are installed. Instead of turning the stabilizer over after drilling and clecoing the upper right skin, I went ahead and drilled and clecoed the upper left skin taking advantage of locating both sides on a nice straight aft spar. I then turned the stabilizer over and let it rest on the clecoes. Using cargo straps at a minimum of three places along each half of the stabilizer, I pulled the skins until they were located according to the instructions. After checking to make sure the stabilizer was not warped, I drilled and clecoed each skin in place. The stabilizer stayed straight and true all through the riveting process. I don’t know if this method is the best but it seemed to work for me.
–Dave Heckart
Single-person assembly: The horizontal stab can be built by one person working alone if it is built in a jig such as the one designed and described by Sid. I had no real trouble bucking the rivets that I was driving. In fact, I learned that I could use my left hand for bucking or driving. This is the only task at which I have demonstrated ambidexterity. Hanging a fluorescent drop light in the horizontal stabilizer assembly helped greatly in that I could see the shop heads of the rivets.
–Joseph A. (Joe) Colquitt
Edge finishing: The trailing edges of the top and bottom skins probably will need trimming (the last step in constructing your horizontal stabilizer). S-H has suggested using metal-cutting aviation snips. Others have suggested planers or other approaches. I found that a hand-held belt sander and a palm-sized orbital sander worked wonders. I removed the extra stock quickly and easily. Then I used a 3″ deburring wheel on a pneumatic die grinder to deburr and polish the edges. Just keep the die grinder moving! If you stop or slow down, you’ll cut into the edge. The belt sander will remove stock quickly, so I suggest using a wide-tipped red marker pen to draw along the inside of the skin adjacent to the spar. This leaves a buffer area which can be seen and left unsanded. Then the palm-sized orbital sander can be used to remove this remaining stock (with more precision and less likelihood for mishap). In all steps, keep the tools moving. Any of them can cut into the stock more than you may want!
–Joseph A. (Joe) Colquitt
Horizontal stabilizer skin fitting: I’m sharing my experience with horizontal stab skinning, for the benefit of anyone else who’s having trouble pulling the skin far enough aft to align the rivet holes with the spar flange centers. I found that an unreasonable amount of force was required to draw the skin back so that the forward spar lower rivet line was at least 1-1/2D from the flange bend, much less bring it back to the pre-drawn line. The chief cause of the problem was the bend radius over the nose ribs. To alleviate this, I reduced the width of the forward end of the nose rib by fluting the nose rib web with a pair of fluting pliers. This reduced the dimension by less than 1/32, which was enough to make a dramatic difference in my ability to draw the rivet lines aft. Since the nose ribs are basically formers (not significant structurally) I don’t see any drawback to this, as long as it isn’t overdone.
–Matt Weingart
Fitting the skin to the ribs: Don’t use expensive ($20) ratchet woodworking strap clamps on the skins. It is so easy to damage the skin by overtightening. Use simple cargo strap clamps ($5.00 each Home Depot-10 req’d) over each rib, not including the end ribs, that can only be pulled hand tight. Use 2″ x 6′ long x 1/8″ thick aluminum angles ($20.00 ea Home Depot-2 req’d) under the straps, just forward of the forward spar to hold the skin against the ribs. I covered the edges of the angle that contact the skin with black plastic tape to protect the skin. This forms the skin nicely against the ribs with only a small strip of foam placed under the strap near the main ribs to make 100% rib contact. No dents, no hits, no errors. I plan to use the same angle/strap/foam setup on the wings.
–Gus Gustavson
Horizontal stabilizer jig: Here’s a description of the assembly jig that I made for this part of the project after trying to fumble through without one. It was apparent with careful reading that the rear spar needed to remain straight so I made 3 2×4 L’s (2 -2×4’s long ways at 90 degrees) about 8″ long and screwed them to my angle iron bench with the built up plywood top so one would be in the center and the others would be between the 1st and second rib from either end. I then aligned the 2×4 L’s with a string both horizontally and vertically then screwed the rear spar to them, aft down, with a sheetrock screw and a small piece of wood. I also skipped ahead and installed the aft attach bracket and used one of the holes to fasten the center of the spar. After assembling the ribs and front spar, I installed a braced upright at both ends of the assembly and used a piece of scrap aluminum to tie the front spar to one end. Adjust the braces so the skins match the ribs vertically in the jig. I then made a plywood gauge so that the top and bottom spars touched it at precisely the same time when used on the bottom side of the stabilizer and used it to duplicate the connection on the other end of the spar. I then kept it handy so that I could check my progress. I just used a scrap piece of 1/2″ Plywood that I had nearby, doesn’t have to be fancy. This little “jig” worked just great as the skins virtually fell into place without any hassle and a strap was only needed once at the center of the assembly when installing the left skin. I’ve only got one more rivet to install (boogered one) and the string says the center is out by 1/16″. (should have used the gauge one more time ).
Another little item is the center line marker. I drilled a 7/16″ hole in a scrap piece of 1×3 – 3/8″ in from the edge and put my marker in it. The center lines on the spars were very accurate by sliding it along the bench top and against the spar.
Took more time to write about it then to do it.
–Mo Brooks
Horizontal stabilizer nose rib positioning: Here is another way of getting the horizontal stabilizer nose ribs in position for drilling. Building the horizontal stabilizer in a vertical fixture, I found it easier to move the ribs for alignment to the red line by attaching a set of lines to each rib and marking the lines Ll, R1,L2, R2 etc. I then ran these lines out the tip ends and through holes in my vertical 2 by 4’s and the bottom access door. Worked very well. Trying to get a rod in there was just too much effort. Also, the string method did not scratch the inner skins as would a rod with a washer on it.
–Jim Rose
Jig: I appreciate all the advice of those who have gone before me in assembling the tail surfaces. I too had difficulty in accepting the manuals’ version of assembling the horizontal stabilizer with their version of a jig. Sid’s idea for a jig works great but I was hesitant to put all my faith in the material available for the uprights, especially anything made of wood. I decided to go to the local metal supply house and pick up a couple of 7′- 3″ x3″ aluminum box beams. They were not cheap but I can guarantee you that they will not warp. Once I installed them on my bench and bondoed them to the floor, I fabricated a couple of brackets out of 2″ angle iron, two each for the forward and rear spars, to cleco the spars to and mounted the brackets to the uprights. I made sure to install the brackets so that the forward and aft spar lower surfaces were flush with one side of the uprights. The only thing left to do was to support the forward spar at about midpoint to take any sagging out before fitting the skins. The spar/rid ladder is installed between the uprights nose down as per Sids’ version.
–Tom Fleming
Z Rib alignment: When building the trim tab, rivet the Z ribs together in their final positions and keep them from moving as much while drilling the skin rivet holes. Also, be sure of the position of the control horn with respect to its reference line.
–Gary Kent
That little servo cover: 2024-T3 also 6061-T6 is tough stuff and really won’t easily form to a compound curve when pounded against a wood block. BUT fire up your torch (even a propane one will work) and anneal the aluminum. Now you will find it hammers like butter. No need to re-temper as the cover is not a structural item.
–Jeff Liot
Cinching up the skin: The skins are currently being fitted onto the spars and ribs of the HS. I thought I had discovered a really cheap set of metal poles for the HS and wing jig. I used two 8′ long 2&3/8″ fence poles. They are as straight as I could ask for. Fence hardware is used to attach a board to one side for attaching angle iron brackets to. I later discovered this advice in the tip section (great minds think alike). The poles really do work but the board mounting hardware requires planning to avoid interference. I added some extra distance between the poles (2″) but still needed to cut the hardware down later with a hacksaw. Currently I’m using all my band clamps to cinch up my HS skins. Unfortunately I don’t have enough. I think I can use ropes applied like a tourniquet, (wound up with a stick and padded to avoid pressure point dents) to pull these up tight. I used to use these constantly back in my woodworking and furniture building days for clamping wide boards together on edge. Another trick is to use long strips of 2″ wide rubber cut from an old inner tube. I tried these today too and they do a great job of applying pressure without creating marks. Hopefully I can use these and avoid the extra expense of more band clamps. Any more ideas prior to next weekend would be appreciated.
–Michael Harfst
Avoiding strake interference later: Have just recently constructed and prepared the strakes for seaming to the fuse.
Note that the forward most rivets (top and bottom) of the nose ribs immediately outboard of ribs A and B conflict somewhat with the strakes as they clasp the leading edge of the stabilizer.
Nothing that chafe tape won’t protect, but if I was building my stabilizer today, I would dimple and flush rivet those two rivets. Obviously, I have followed the Manual and conventionally riveted my stabilizer.
Those still building may care to incorporate this in their pride and joy.
–Kiwi Pete
Hinge pin keepers: Last night I did step 105 in the horizontal stabilizer section. This is the step in which you make the clever little holder/keepers for the bent end of the hinge pins so they can’t come out of the trim tab or elevator hinges. You are instructed to cut the left over pieces of extruded hinge material so that the sides of each little keeper are flush with the digit of hinge piece. That leaves scant edge margin around the rivet holes for the nutplate and makes positioning the nutplate a very exacting thing. You can’t get the nutplate to sit just right unless you chamfer the edge that sits on the slope of the hinge part.
My idea: cut them a little wider in each knuckle, about 1/16″ or 1/32″ and then trim them to fit once you’ve got the nutplate centered on there. The flange on the HS spar and leading elevator spar is wide enough to easily accommodate this. The flange on the the trailing elevator spar is narrow and you don’t have a whole lot of room so you just have to lump it on those two.
–Brad Cruz
Horizontal stabilizer, shortening of ribs A and B: I used a time-saving method for shortening ribs A and B — which is performed to accommodate the thickness of the doubler that is placed inside the spar and to which the ribs attach. The instructions step you through cutting the flange off of these ribs and riveting a new, shorter, flange piece on (that you have to make). Instead, I marked a line about 3/16 in. in front of the existing flange bend. Then I simply straightened the flange out in the vise and then re-bent the flange using the new line as a bend point. The length of the rib thus being shortened as needed to accommodate the doubler thickness. The resulting flange width is slightly larger then the other rib flanges but the excess can be trimmed if desired. You may have to straighten and re-bend a time or two in order to end up with the correct rib length. I did this process in a matter of 5 minutes — much, much, less time than cutting off the flange and cutting a new piece to rivet on. ONE IMPORTANT POINT – Do not drill the holes in the flange at this end of these ribs until after you have re-bent the flange to fit, else you will end up holes that no longer line up with the holes in the spar. You will then be left with reverting to the instructions to cut and refit a new piece or using “as-is” and having a rib that is not straight (90 degrees) between the spars. If the rib is “off-center” on the doubler end too much then you might violate the rivet hole location tolerance on the upper and lower flanges of these ribs when the skin is fitted and the skin pilot holes are drilled.
–Steven Jakulski
Keeping it Straight!: Keep the upper part Aft Spar of the Horizontal Stabilizer and its associated rivet line straight and flat including anything associated with it. She same is true for the upper part of the Forward Spar of the Elevator. This is not an easy goal to achieve, especially with all the other things the manual tells you what to do while maintaining rivet edge distance. If is not kept straight, several ingenious fix-it plans for the hinge that goes between them can be done using more time, with more and different parts. What follows is somewhat long, but I try to have it match up to the manual so it can be easily followed. I made the mistake of not checking and have spent almost 40 extra hours over three weeks fixing the problem with $90 of extra parts. This is my “lesson learned.” My manual is revision C.
In the manual, this begins at Section IV: Horizontal Stabilizer Step 2: Mark Rivet Lines on the Flanges of the Nose Ribs and Spars and comes to a BIG BRICK WALL at Section V: Elevator Assembly, Step 80: Position the Elevator Hinges and Drill Index Holes.
As you assemble parts, stretch a string along key points of the Horizontal Stabilizer to check straightness. I used a nylon cord that is stretched TIGHTLY and clamped in place with side clamp Clecos. I used the Jig mentioned in this forum and tried using a 6-foot long aluminum Extrusion as straight edge. A straight edge is not good enough! The string is the best. (Thanks Mo Brooks) It is light and easily pulled VERY straight. Clamping it to something other than the Horizontal Stabilizer can be difficult. Have two helpers hold, it if you need to, while you check the parts. The upper aft Spar and associated rivet line should be within 1/16″ or better.
I would check the following areas as you build:
Section IV: HORIZONTAL STABALIZER ASSEMBLY
- Step 2: Check spar rivet lines while the upper aft edge is held straight.
- Step 4: With the ribs cleco’ed in place, check the straightness of the forward line of the Main Ribs. Also check if they are equidistant to the aft spar. Make adjustments as necessary to align them.
- Step 7: (This is the toughest) The right skin must intersect so many things at once on top and bottom it seems impossible to do it all. The aft spar will bend when all this is being done. Support and check the upper aft edge and the rivet line for the entire length. (My rivet line was out .145 and I didn’t even know it.) There is a note in Step 7 about this but I think it should be a warning. Helpful hint: In using my 2 pieces of 6 foot long, 2″ x 2″ x 1/8″ aluminum extrusion strapped to the horizontal stabilizer, just forward of the forward spar rivet line, top and bottom, I was able to bring the spar snug against the ribs without crushing the skin. I taped the edges of the extrusion legs so as not to scratch the skin. I also used the cheapest non-ratcheting cargo straps I could find with one strap over each rib. After reading the horror stories here, I chose something different and it worked great.
- Step 11: The left Skin should be checked with the right for total rivet line straightness and Spar straightness.
- Step 26/27/28: Temporarily mount both skins and Rear Spar to recheck rivet line and spar straightness prior to riveting. Ensure the device used to hold the spar does not allow it to move while riveting.
- Step 29: Last check for aft spar rivet line straightness.
- Step 31: Keep the top edge straight while riveting the lower edge of the spar. Helpful hint: Rivet squeezers work well here over the curved skin but the standard yoke doesn’t. I purchased the longeron yoke from Avery tools for this. It still needs a little finesse but after a couple of practice (no rivet) hits, it went well. I sanded a small chamfer on the part that fits in the spar so it would not catch the rivets inside the spar as the squeeze was activated. With pneumatic squeezers it is a little tricky to swing the yoke in as it comes to bear on the rivet stem. I have a two-stage trigger on mine that makes this easy. Maybe all of them do. I am not sure.
SECTION IV: ELEVATOR ASSEMBLY The elevator is not as difficult as the Horizontal Stabilizer to keep a straight line but it must be checked during build just the same. Helpful hint: Use the hint offered in this forum in using a straight angle iron or aluminum secured to your bench edge. Clamp the spar to it as you build.
- Step 20: Check spar rivet lines while the upper forward edge of the spar is held straight. Step 25: Check the spar rivet line is equidistant to the spar edge while the spar is held straight.
- Step 28: The lower-left skin rivet line should be in-line with the right.
- Step 35: Check spar rivet lines while the upper forward edge of the Spar is held straight.
- Step 37: The upper-left skin rivet line should be in- line with the right.
- Step 56: Check the forward spar rivet lines are straight before the skins are riveted to the Aft Spar.
- Step 58: Last check for Forward Spar rivet line straightness.
- Step 80: This is it. If all was done well, then you may be saying, “no problem”. BUT
Helpful hint: If by chance the hinge does not have enough edge distance, consider buying a MS20001P5 Hinge from Aircraft Spruce or other Aircraft part supply. Buy only Mil-Spec parts. The -5 hinge will fit perfectly with the -4 issued with your kit. I used a -5 in the center section under the horizontal stabilizer. Ensure the longer hinge does not ride up on the Spar radius. You may have to radius the edge same as the spar caps to remove interference.
–Gus Gustavson


