 Installing the Windows: A friend suggested a new way of locating the plexiglass panes in the windows and doors of the Glastar. Window with tabsI tried the method and found it to be simpler and easier for me than the procedure shown in the manual. A 3/4″ wide strip is lightly sanded along the edge of the outside surface of the plexiglass and masking is applied inside this line. 1″ pieces of tongue depressor are hot-glued to this strip each 6 to 8 inches. The pane is then centered in the cut-out and three or four #40 holes are drilled and clecoed through the wood and into the outer laminate of the fuselage skin at the high points.
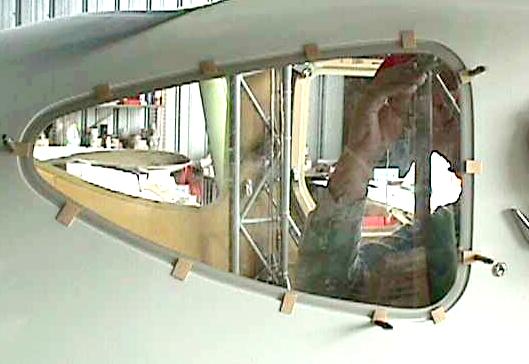
Then a line is drawn on the inside surface of the plexiglass at the edge of the cutout. The inside surface is masked inside this line and the surface is lightly sanded outside of the line as specified in the manual. The window is then installed with the mixture of resin, mil fiber and Cabosil between the inside surface of the pane and the window cut-out. Make sure that enough of this mixture is used so that both surfaces are contacted by the resin mix when the pane is clecoed in position. After the resin has set up the clecos, hot glue and wood strips are removed and the gaps can be filled inside and out with more of the resin mix. This results in windows flush with the fuselage surface. If desired, a shallow depression can be sanded into the junction and a strip of bi-directional cloth added to strengthen the joint and protect against future differential expansion of the plexiglass and fiber glass structure. This method leaves some #40 holes in the fuselage skin which need to be filled, and assumes that this can be accomplished as part of the general clean-up prior to painting.
–Al Sibley


Widow sealing: I don’t make any adjustments for window height (flush with surface) with the small dabs of filler. When the final bonding mix cures, it shrinks slightly and leaves unsightly marks which can be seen through the acrylic. I simply mix up a medium thickness batch of resin, used black toner,and cabosil. I carefully brush this on the edge , a thin coat, taking care to keep it off the tape. once cured, I mix up a thick batch of the black goo and bond the windows in. I hold the windows in with waxed #40 clecos which were drilled between the window edge and the flange joggle. space them about every 8-10″ apart. Then mark the inside flange edge onto the acrylic with a fine BLACK pen.Before removing the window to tape the inside surface, mark several lines across the window paper surface overlapping onto the gelcoat surface. these will serve as index lines so you are sure to get the window in exactly the same position when bonding it in. why is this critical? if the window shifts on you ,the tape you used will be trapped between the window and the plexiglass forever. Use a 1/2″ wide electrical type tape. you have to look around some to find it , but it is worth the effort. 1/2″ tape will make smooth inside and outside curves. I double stack it on the edge of the window which gives it extra pulling strength when removing it. Also lay it double wide , then finish taping the rest with masking tape and paper.It helps to have a wide FLAT margin along the window edge (both sides) for ease of wiping up the excess with tongue depressor square on end. Once the window goo is cured, remove the clecos and sand the roughness around the holes and fill.
–Ted Setzer
Window Installation: I hate to do this because I don’t want to lead anyone astray. Remember the one airplane short test time rule. Keeping that in mind, here is the procedure I used on 98PW for window installation.
- Find the proper size of rubber u-channel.(approx. 1/4″ – 3/8″ long legs as thin as available) Secure the u-channel around the edge of the mounting flange.
- Fit the window in its mounting flange insuring a minimum 1/16″ clearance all around the edge. Then bevel the outside of the window edge to insure its surface is below the fuselage surface.
- Trace the inside of the window all around the rubber u-channel. Mark and paint with a gloss black acrylic paint.
- With a caulking gun and a tube of black marine grade urethane place a generous bead between the u-channel and the flange perpendicular surface.
- Press window in place so that it contacts the rubber u-channel and urethane oozes out around the edges. Clean-up the excess urethane above the window surface and allow it to cure per instructions.
- Tape the outside of the window about 3/16″ from the edge and run a bead of epoxy to fill and form a transition surface from the fuselage to the tape. The epoxy should be semi-rigid, sandable and paintable. Once hard it should form a mechanical overlap over the beveled edge of the window. The epoxy I used I found in a body shop. It was used to repair flexible auto bumpers. You may try 3M for other options.
- After the epoxy hardens sand and feather edge the transition surface from the fuselage to the tape. Remove the tape and replace it with fine-line tape 1/8″ or so from the removed tape line. Re-feather edge and paint the fuselage.
I am having a problem with the primer not adhering to the epoxy in spots. I think it was because I primed too soon before a full curing out of the components I used. Since I repainted, it appears to be holding. I hope this helps and gives you some ideas.
–Richard Wass
Some window installation tidbits: First, I tracked down the urethane adhesive that we experimented with on the new demonstrator. It was U-418 Quick Cure Primerless to Auto Glass Urethane Adhesive made by Essex Specialty Products. This is a sticky black adhesive that comes in a standard caulking tube.
We tried this on one of the door windows using essentially the same procedures called out in the manual. Initially, we were very encouraged, because the installation went more smoothly than a standard resin job. However, on curing, we found that there was considerable shrinkage which caused the adhesive to pull away from the glass around the little stand-off dabs of adhesive that had been applied initially to bring the window flush with the door. The result seems perfectly strong, but it is not very sightly. In the end, we didn’t like the product any better than vinyl ester.
We never did replace the windshield in N824G. As many of you have seen, that windshield had an area of serious crazing about 3 inches in diameter directly in front of the defroster duct. The location of this defect led us to believe that it was probably heat-related! So don’t blow all your defroster air out a single round hole–use a defuser of some sort.
As far as replacement of windows or windshields bonded in with vinyl ester, we have never done this on a GlaStar, but have recently had experience with replacing a Glasair windshield that had developed a crack after 2,000+ hours. The installation procedure is identical, as would the removal procedure be (with the exception that the 3/8 in thick Glasair windshield is more work). Our mechanics (2 of them) spent about half a day with rotary cutting wheels and die grinders to remove the windshield. They first used the cutting wheels to cut around the perimeter of the windshield perpendicular to the surface to the depth of the joggle (ie, the thickness of the glass). Then they used rotary grinders to grind away the glass at a beveled angle to the perpendicular cut until the windshield came free. The job was dusty, and certainly a fair amount of care was required, but it was not difficult, and after a bit of touch up sanding, the joggle was ready to receive the new windshield w! ith a minimum of hassle.
If you compare this to the task you’d face in trying to replace a window bonded in with some more flexible adhesive, I think that could potentially be more difficult. Imagine trying to remove some gunk that couldn’t be ground or sanded.
Also, a final testimony to vinyl ester: prior to grinding out the Glasair windshield, Cliff Faber decided to conduct some destructive testing. Repeated and spirited blows with a framing hammer from inside the airplane were unable to budge the plexiglass-to-fiberglass bond. Cliff finally put the hammer through the glass, still with no evidence of bond failure. This kind of strength is more important in the Glasair, where the windshield is a structural element of the airframe, than in the GlaStar, but still.
–Craig O’Neill, SHAI
How to keep the windshields from cracking during installation: I can’t stress enough as mentioned in the manual about properly preparing the edges after final fit to eliminate all scratches and or nicks or saw marks and easing the edge of the acrylic.
- The procedure in installing the top deck needs to have the sequence amended to include the preliminary fit of the windshield at the same time as the top deck is being fit. This will greatly improve the fit of the windshield in relationship to the hull and during the installation procedures of the windshield it will not be necessary to apply undue force on the acrylic to hold it into proper position. This is one of the largest contributors to cracking during installation.
- Avoid any and all solvents as they can contribute to crazing and eventual cracking.
–Danny Defelici, Airlink Technologies
Windshield crazing: I was curious about the crazing that was reported by SHAI on the windshield of the prototype. Today I went out and flew 98PW with a temperature measuring device. We went up to 4500 feet. The outside temperature was about 30 degrees F. I placed the temperature probe over the defroster outlet. The temperature went up to 160 degrees in minutes and my probe would not measure any higher than that. It began to soften the nylon protecting tip. I can see how these high temperatures would affect the windshield over a period of time. It appears necessary to diffuse the defroster outlet to prevent problems since the windshield is only two inches from the outlet.
– Richard Wass, 5204 – I was curious about the crazing that was reported by SHAI on the windshield of the prototype. Today I went out and flew 98PW with a temperature measuring device. We went up to 4500 feet. The outside temperature was about 30 degrees F. I placed the temperature probe over the defroster outlet. The temperature went up to 160 degrees in minutes and my probe would not measure any higher than that. It began to soften the nylon protecting tip. I can see how these high temperatures would affect the windshield over a period of time. It appears necessary to diffuse the defroster outlet to prevent problems since the windshield is only two inches from the outlet.
–Richard Wass, 5204
Windshield cracking: I talked with a guy the other day who is a pilot and also an executive in some plastics company here in the SF Bay Area. Here is a short version of what he told me:
When acrylic plastics are made at the plastic factory, the sheets cool faster on the outside than they do on the inside. So, unless the plastic is annealed using a carefully controlled procedure, a sheet of acrylic plastic will have a lot of stress built-up between the center of the sheet and the outside of the sheet. (Polarized light / glasses is one way to “see” the stress.) When the vapors from certain solvents — particularly lacquer thinner — contact the surface, they cause the molecules (which in these plastics are real l-o-n-g chains) to break apart. When the chains get broken the surface layer becomes locally weaker and the internal stress causes microfractures or “crazing” of the surface. He said vinyl ester resin had some, but not a lot, of the chemicals in it that would cause the crazing. I take this to mean that the vinyl ester resin is not completely compatible with acrylic but it is not extremely aggressive against it, either. I also take this to mean that we should not have any lacquer thinner vapors about when we have the windshield surfaces or edges exposed.
He went on the say that every time a piece of acrylic is heated then cooled, it shrinks a little bit. If the heating/cooling occurs over a large area of a bonded structure (such as our windshields), the perimeter bond usually holds the sheet as long as the adhesive has good shear strength — and particularly if there is any give in the adhesive. (There is no flex or stretch, of course, in the vinyl ester resin method of bonding our windshield.) He said that if localized attachments are used (such as screws, etc) the shrinking tended to localize at those locations and cause early failure of the joint due to the stress at those points. I take this to mean that we should not use screws — plastic or any other — to anchor the windshield.
When I described that I had heard that the GlaStar prototype suffered windshield crazing because of a defrost outlet directed against the inside, he said he wasn’t surprised and that it was due to the localized stress set up because 1) the stress created by the hot on one side cold on the other side, and 2) the stress set up in the shrinking that occurs each time the focussed hot air was applied and then cooled. He said it was important in a/c defrosters to spread the heated air over a big area and to mix the hot air with cold air before flowing it onto the windshield.
–Dennis Douglas #5220
Holding windows in position: The manual suggests that we use tape to hold the top deck windows while they are drying and a few sharp ink pen-locating marks to re-locate their original position for bonding to the fuselage top deck. As I have little confidence in getting things back to their original settings (especially when the window tends to move around a lot when set in Proseal and is slightly curved) I made a small change to this procedure.
To reposition the window(s) to exactly their original tape outline position, I drilled four #40 indexing holes in each corner of the window and top deck. When ready for bonding, I used four clecos to hold and position them while drying. After drying, I will fill the four holes with a little Proseal. Granted these holes will show from the top, but that I can live with knowing that each window matches its original masking position. With no tape in the way, it was very easy to use the 2″ radius stick to run around the joint for smoothing. Also, each hole was drilled with a drill for plastics and lightly smoothed with a small file.
–Jim Rose


