This builder hint was John Schroeder. The procedures were used on a Glasair Super IIS FT
Background
In step 2N7, the process starts by cutting the lead sheet in several pieces (1.5″ x 5″) to make a weight. The amount of weight is calculated by taking 60% of the total moment from step 2N5 and dividing that figure by the moment arm of 9.5 inches. You are then directed to bolt the pieces to the internal counterweight arm, evenly distributed on both sides of the arm. I did this and had 6 pieces on each side. I could not get the washer on under the nut and with just the nut, there was only 1 thread showing. In addition, the whole thing looked bad!
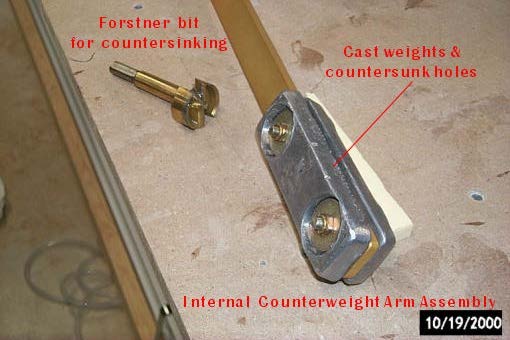
Since there has been some discussion in the Glasair Forum about interference of the weighted arm and the internal sides of the vertical fin, I decided to cast the weights and counter-bore the holes to accommodate countersinking the bolts, washers and nuts. The weights are very slightly thicker than the stack of lead sheets (1/32″ to 1/16″ per weight), but the whole thickness of the assembly (weight-arm-weight) is thinner by the combed thickness of the bolt heads, washers and the nuts.

Calculating the Moments
- Multiply the total moment calculated previously by 0.60 (60%) and divide that by the 9.5″ of moment arm called out in the construction manual (pp. B75 and B80 of SIIS manual). This will be the total weight of both pieces that will be bolted to the internal counterweight arm. Divide this total by 2 to get the weight of each piece. My weights were 525 grams each, starting with a total moment of 16,608.5 inch-grams.
- Add the following:
- 10 grams for two holes (9/32″).
- 105 grams for two 1-1/4″ D x 1/4″ countersink bores.
- 20 grams for slag and un-poured drops of lead left in the ladle.
Cut two stacks of lead to a total of: your final desired weight (step 1 above) + 135 grams (step 2 above). This totaled 660 grams per stack for me. The actual cast weight was 645. It is better to be 10 to 20 grams heavy because you can bore a little more out of each counter-bore/countersink hole.
Fabricating the Plug and Mold, and Casting the Weights
- To make the male plug, cut a piece of 1 x lumber to a length of 5-1/8 ” by 1-5/8″.
- Sand all 4 edges to a taper (1/16″ off each side). The dimensions of the plug are then 1-1/2″ x 5″ on one face. Sand this face to round the edges slightly. (See figure 1) This and the taper are to allow for easy un-molding of the weights and a neater appearance.
- Wax the plug with a thick coat of Butchers Furniture wax (or equivalent). Cut a fairly sturdy cardboard box down to leave about 3/8″-1/2″ around the plug when it lies with its largest face down in the box. Lay a piece of cardboard in the bottom to cover the entire bottom of the box. The top of the box should be 1/2″ higher than the plug to provide a good base for pouring. Put a heavy coat of wax on the inside of the box and lay the plug in the middle of the box with its largest face down.
- Mix enough bondo to cover the plug completely. Gently help the bondo flow around the plug and make sure it is all the way to the bottom and sides of the box. It would help to have the box level so that you will not have too much shaving to do to get the surface (bottom of the finished female mould) flat and stable for pouring lead. Quickly mix more bondo to fill the box to the top. Unmold the female mold as soon as the bondo is firm and remove the plug. I drilled a small hole in the plug and screwed a screw into the hole. I ran a thin exacto blade around the plug and pulled it out. Wipe the excess wax off the sides of the female mold with solvent. Look at the inside of the mold for any indentations and fill them with a small bit of bondo. Shave off the excess with a sharp chisel and sand smooth. Even off the bottom (external) face of the mold to make it lie flat and level on your table. Let the mold dry overnight.
- Level the mold, but make sure it is solid on the table.
- Melting the lead is pretty simple using a propane torch and a large soup ladle. Mine is a 1 cup capacity, stainless steel job with a long handle. It was $3.90 at WalMart. The lead will melt in 2-3 minutes. (NOTE: A thicker ladle may not work well because it takes too much heat away from melting the lead. If you use one, you may need to have a much bigger/hotter torch than a simple propane unit.) Pour the melted lead into the mold. Be extremely careful handling the ladle of hot lead and pour slowly enough to minimize the risk of splashes and to keep as much of the slag/scum in the ladle as possible. Wear eye/face protection and heavy leather shoes and gloves.
- When the lead has set up for 5 minutes, gently turn the mold over and the weight should easily fall out. If you want to drill the weight soon after pouring, gently pour cold water over the lead. Be careful of the scalding steam When it cools off in a couple of minutes, the weight should easily drop out of the mold. Dry the mold off thoroughly.
- Mark the centers of the holes on the outside (smaller faces) of the weight with a center punch.
- Using a 1-1/4″ forstner bit and a slow speed on a drill press (320 rpm or thereabout), bore a hole 7/32″ deep. The point on the bit should index perfectly in the mark made by the punch. Use very slight pressure to keep the bit shaving a thin ribbon of lead. Too much pressure heats up the lead and makes things messy.
- Weigh the weight. It should be about 10 or more grams heavier than required. Bore out enough from both holes to get it to 10 grams above. This is the weight to be removed for the bolt holes.
- Drill the bolt holes using the indented center of the counter-bore as the center-points.
- Cast the other weight and add a little more lead if the first one is a few grams lighter than calculated.
- Bore and drill the other weight. Take more or less lead from the counter-bores to make the total of both weights match your calculations (Step 1 above).
- Clean up the rough edges with a file.
- Don’t be afraid to recast a weight if necessary. It only takes a few minutes. The big piece of lead melts pretty easily without having to cut it into smaller pieces.
Jim Dutton used the mold and the general techniques described above. He achieved a savings of 1/4″ (1/8″ per side) of thickness of the counterweight. Bill Hibbing used the mold with results similar to Jim’s and mine. The mold shows no noticeable wear – just a bit of discoloration.


