This tip was submitted by John Burnaby, FT #2081
I wanted a more precise method of determining where to cut the flap panels, for installation of slotted flaps, than I felt I could achieve by making paper templates and sliding them in and out, span wise, to find the best location as suggested in the manual. Making plaster flap sections seemed to present a simple solution.
I matched the leading edge joggle and screwed it together so that the top panel was parallel to a string line supported by the ends of the panel. Then I taped the trailing edge of the bottom panel to the straight and true supporting table and waxed the first foot of each end of the top panel. I cut some short scrap pieces of foam to slide between the upper and lower panels in the approximate location of the shear web to support the upper panels under the weight of the plaster.
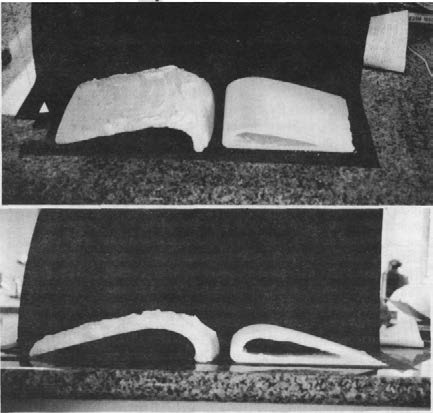
Next I smeared about 1/2″ to 3/4″ of patching plaster over the first eight inches of each end, being sure to tuck it in just under the leading edge. In about 30 minutes, I popped the negative molds off the upper panels and let them dry in a 250 degree oven of about an hour. When the negatives were dry, I waxed them up and loaded them with plaster about 3/8″ thick and then turned them over on to the waiting 3/8″ bed of plaster on my table and smushed the molds down until I was sure that they contacted the table and that I had good contact between the plaster in the mold and the plaster on the table.
Thirty minutes later, I had a full scale flap section of each end to play with and precisely fit to my wing as per the manual. The plaster shaves easily with a Surform and by laying out a measuring line on the plaster section, in 1/8″ increments from the end, before trimming to fit, I was able to cut my flap panels with the confidence of having done it before.
Unlike most things, this process is much simpler to do than to describe. Plaster is cheap and forgiving and working with it reminded me of all the gooey fun I had in kindergarten.


