Submitted by by Mike Palmer, Glasair I/II FT
Three hints—two about aileron counterweight arms, one about easing maintenance of the brake master cylinders.
When mandatory Service Bulletin 150 came out (which was about possible rust forming in the bottom of the Fram fuel filter assembly), it reminded me that I’d been meaning for some time to check the inside of the aileron counterweight arms for rust, too.
I don’t know how many of you have thought about rust forming in the counterweight arms, but since these things are made of metal and have a low spot near the lead weight, they seem likely candidates for rust. Those of us who built our Glasairs in “the old days,” who had to make our own counterweight arms, may have given some thought to corrosion prevention by coating the inside of the arms with linseed oil or some other product after we formed them.
I know I did. However, I suspect that most newer builders, who had the counterweight arms supplied by the factory, never gave corrosion protection a second thought.
It seems to me that water could collect in the arms, either from condensation, from washing the plane, from rain water being swirled around as it sheds off the wing in flight in IMC or even by a strong wind when it rains on the ground.
Unfortunately, there’s no drain hole in the arms.
Due to the concave shape of the assembly (which causes a low spot), it seems to me that whatever water might find its way into the tube could sit at the same place for a while (just aft of the lead), and could eventually rust out the 4130 steel tube with disastrous consequences, not only for the pilot, but potentially for some unfortunate on the ground as well.
Well, I finally got around to pulling our arms off (sounds painful!) for inspection. Even though we live in the desert, and even though I had treated the metal to inhibit rust, I still found a good amount of surface rust inside the 4130 tube. (This after three years and 700 hours of flying, about 10% of it in IMC.) It wasn’t very deep (i.e., there were no pits), but we live in the desert where rust usually doesn’t get very far. I’d be curious to know what some of you who’ve been flying for ten years in less friendly environments discover.
Now, another hint related to the counterweight arms. While taking off the left side arm, I found an interesting problem. Inge and I have constant battles over bolt torque. I think what happens is that I’ll torque something down, and then she’ll check it a month later, only to find that the bolt could take a little more torque. I wrote about this in a previous Glasair News. The phenomenon is due to two things: the fiberglass shrinks with heat (in hot areas like the engine compartment), and I think the glass takes a bit of a set after being clamped with a bolt. Both can result in some looseness.
In any event, she takes this like I didn’t torque the bolt down correctly in the first place. So, sometimes she’ll insist that she torque a bolt. This was the case with the aileron counterweight arms.
Inge tends to over-torque bolts. (Got to make sure they’re good and tight, right?) Well, aside from the obvious problem of breaking a bolt, there’s another problem you can cause.
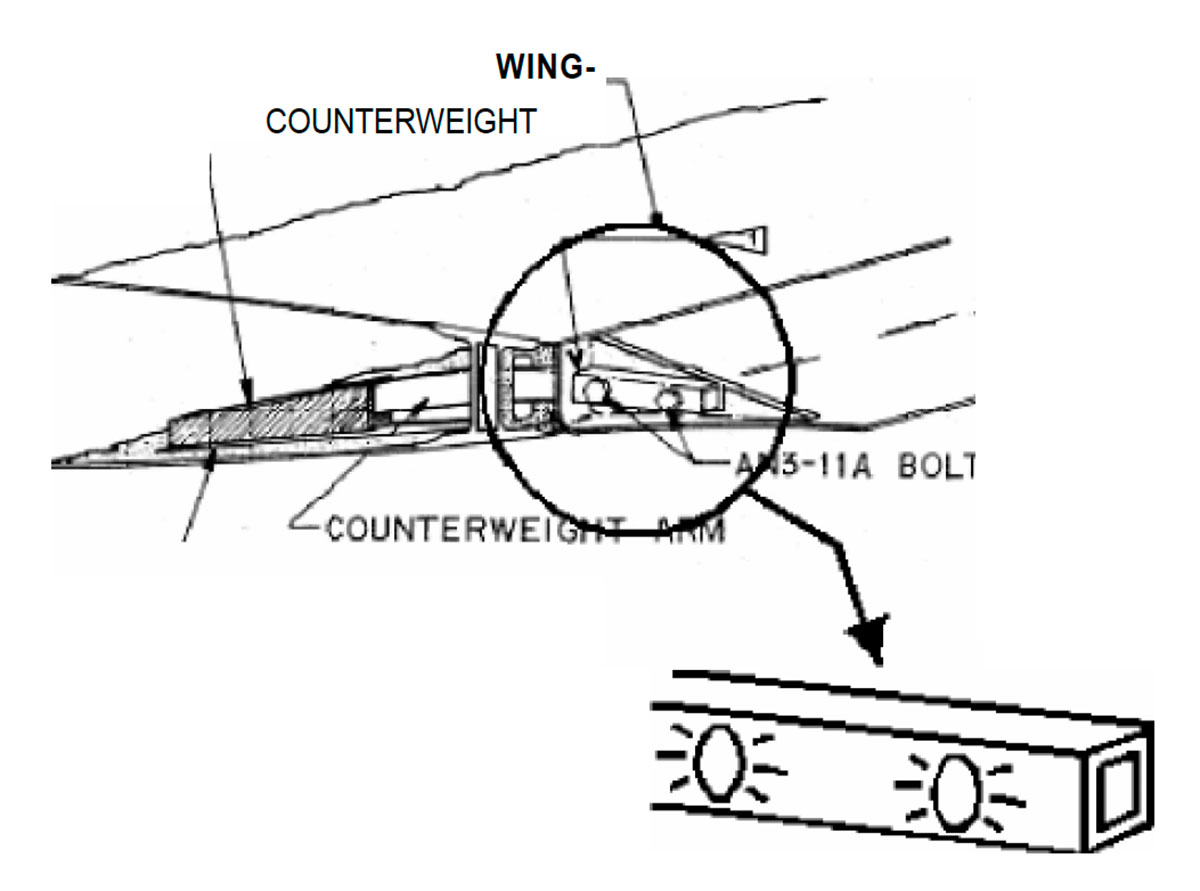
In our case, Inge managed to crush (or at least severely dimple) the 4130 tube on the counterweight arm (see Figure 1).
I can understand Inge’s concern: you don’t want the counterweight arms coming loose in flight. And the way the fiberglass gives, it’s often difficult to know if you have something tight enough. But this is a bit too much.
Once the tube begins to collapse under the bolt head, it’s difficult to achieve the proper torque. When the tube collapses, mechanical engineers say it has undergone “plastic” deformation.
A good term, because it sure feels like you’re trying to achieve torque on plastic. Once this process has started, it’s very easy to continue deforming the tube as you try to feel when the bolt has snugged up.
I think the best solution is to put spacers inside the tubing, sized so that they just fit inside the tube, thus preventing the tube from crushing when you torque the attach bolts (see Figure 2). If you don’t want to do that, perhaps some AN970 washers (if you can fit them through your end cap cutouts) will help prevent crushing the tube in the first place.
So now you have two things to check for when you pull the counterweight arms—rust and mechanical damage. How about posting your findings about rust in the rec.aviation.homebuilt newsgroup?
Now the last hint. I had to crawl under the instrument panel this week to remove a weepy brake master cylinder. What a pain! It was easy putting all those cotter pins on the rudder pedal assembly when we were building the plane, but trying to remove them now that the plane is built is extremely difficult. It took about three hours just to get one out! (You have to lay on your stomach with your head under the instrument panel while your wrist contorts to remove a cotter pin that you can’t see.) Now that the job is done, I plan to use some “hair pin clips” I found at the hardware store (Ace) instead of cotter pins. (Hair pin clips are miniature versions of “lock pins” like the ones you typically see on Piper Cub cowlings.) Using hair pins instead of cotter pins should make any future R&R job much easier. If you’re still building, you may want to consider making this change now. You’ll be glad you did.


