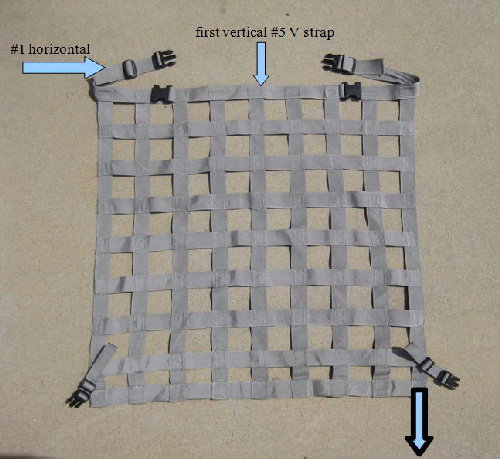
This tip was submitted by Heidi Tillinghast.
Materials
Advertisement
- 1.5″ nylon webbing
- #18 needle
- #69 Nylon bonded thread
- 1.5″ Webbing clips
All of this is available in most upholstery stores or online. I used a regular lightweight Singer sewing machine.
* When I made this cargo net, I simply laid it out and cut pieces as I went. I brought it to the plane to assure fitting before attaching the last row and clips. I made minor adjustments. These directions are reverse engineered, so just take them as suggestions.
- Top horizontal strap- This is the first piece (1H). All vertical pieces attach to this #1H strap. Measure and cut to 60 inches.

- Cut 9 vertical straps- Fist and last strap measure 36 inches to allow for clip attachment to the cage. Straps 2-8 measure 32 inches. #1V-9V
- Fold #1 horizontal 60 in. strap in half and attach the first vertical piece to the center point. This is Vertical strap #5V. Zigzag to stitch vertical piece on top of #1 horizontal piece. Now you have a giant T shape. When sewing, zigzag around the edges twice so the webbing is secure and will not fray.
- From the center of the vertical center piece work out each way to form a top strap with 9 vertical straps hanging down. Use a square to make sure V straps are perpendicular to #1 H. This will help keep your project square. Measure exactly 4 inches from the center of 5V to the center of 6V. Work 4 inches on center for all vertical straps. That will give you an end result of a 32 inch wide cargo net.
- Cut 8 32-inch horizontal pieces. Measure 4 inches from center of each vertical strap. Make sure to pin and double check squareness prior to sewing. Zigzag each piece for strength and to prevent fraying.

- Before attaching the last row, fit to the plane. I had to make my last row only 3 inches on center due to the way the closeouts were made.
- When measuring on your plane determine where you want to place the female horizontal clips. Use about a 4 inch-piece of webbing to loop through the clip and sew it to the #1 horizontal strap.
- Put clips on and adjust as needed.
A better design than ours is to have that 1st and last V strap extended to allow for the web clips. That is something you will just have to fit and decide at the end of your project.


