Break-in of an engine refers primarily to the initial phase of operation in which the piston rings will “seat” against the cylinder walls.
Run-in refers to the initial test run of the engine to determine a) that it will run properly and produce rated power, b) correct any oil, fuel or induction leaks, c) verify the throttle, mixture and prop controls are functional as well as the fuel system, d) verify proper fuel and oil pressure, e) essentially prepare the engine and its controls for initial flight and break-in.
For the amateur builder who lacks a test stand, run-in (with the cowling off ) should be kept to a bare minimum and not any longer than it takes to verify the safe, leak-free operation of the engine. At our facility, we generally keep this time under 10 minutes knowing that Lycoming has previously conducted a minimum of one-hour run-in at the factory. Note that factory new Lycoming engines come with preservative oil. NEVER turn the crankshaft unless all oil has been drained from the cylinders by removing the lower spark plugs.
I have had the pleasure of conducting many of the initial Phase 1 flight tests on Two Week To Taxi Sportsman aircraft over the past five years. In doing so, I have basically followed Lycoming’s break-in instructions spelled out in Service Instruction No. 1427C. Occasionally we install engines from Aerosport Power with ECi cylinders, both which publish their own break-in instructions, plus I’ve had discussions with others who are in the business of overhauling aircraft engines who’ve offered advice on what they believe are the most important things to pay attention to during this critical phase.
Even though Lycoming service instructions state the preservative oil can be run for 25 hours, we completely drain the preservative oil from the sump and cylinders and add mineral oil. Prior to starting a new or overhauled engine for the first time, be sure to pre-oil the engine. For the amateur builder, this is accomplished by removing all the lower plugs to eliminate compression and ignition and cranking the engine with the starter until an indication of oil pressure is seen on the gauge.
Avoid running the starter for more than 10-12 seconds at a time. Cranking the engine in short segments to avoid overheating the starter will eventually get the oil pressure up. Some overhaul shops will disconnect the oil line to the pressure transducer and use a pressure pot to transfer warm oil into the engine through this port. (The restricted orifice fitting at the engine-end of the hose needs to be temporarily replaced with a nonrestricted fitting). In this manner, all the critical oil journals are filled and lubricated.
One of the common denominators between the engine manufacturer, overhaulers and old-timers is the warning to avoid prolonged taxi or ground runs on a new or freshly overhauled engine. In other words: “get it in the air quickly and run it like you stole it ” as stated succinctly by one of the advisors to this article. Excessive ground runs can result in glazing of the cylinder walls caused when excessive oil gets past the new unseated rings into the combustion chamber and oxidizes. It builds up on the cylinder walls plugging the honing valleys critical to oil passage and usually can only be removed by cylinder removal and additional honing. Bad stuff!
While Lycoming instructions state that one should keep cylinder head temps within limits (redline is 500°F), ECi’s booklet warns against cylinder temps over 400 degrees. ECi cautions that cylinder temp probes are in the heads and the cylinder barrels can be hotter as the sharp scoring (honing) of the cylinder walls and piston rings are generating excessive heat especially during the first 0-5 hours. High cylinder heat drives the oil from the honing valleys and causes excessive rubbing of the rings on the cylinder walls leading to scuffing where metal actually transfers from one surface to the other. Really bad stuff!
While excess heat is to be avoided, excess cool should be avoided as well. Loren Lemen of Lycon warns that the engine needs at least 300°F cylinder temp for the rings to properly seat. Temps lower than that invite “glazing” of the cylinder walls because low cylinder temps are typically an indication that the engine isn’t putting out enough power to put the necessary pressure on the rings against the cylinders allowing oil to blow by the rings. So the best thing for the engine is to get it in the air and run it at the power settings and temperatures that produce the optimum conditions for ring-seating.
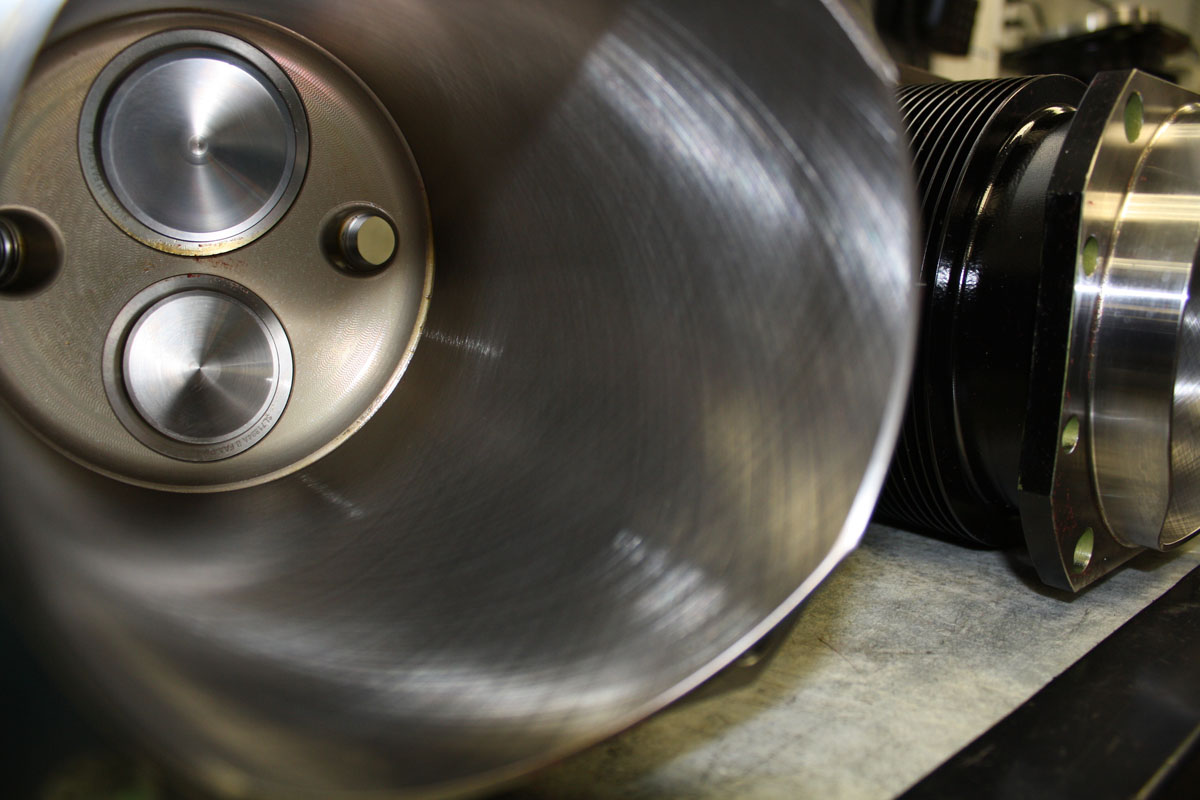
The IO-390 engine uses an angle-valve cylinder head design with nozzles that squirt oil on the back-side of the pistons resulting in less heat transfer to the heads. This requires a larger oil cooler for the 390 cu. in. engines.
When I break-in Lycoming engines, I see cylinder head temperatures 50-60°F lower on 390 models than with 360 engines.
On a typical first flight with an IO-360, I will experience cylinder temps in the 380°F or higher range and will reduce both power and climb angle soon after take-off to keep the temps under 400°F especially in the summer. If not, the cylinder temps can easily get to 425°F or above.
Conversely, I typically observe a cylinder temp range of only 325-375°F with the IO-390 engine even in the summer time. During winter, one can even use duct tape to partially block off the engine inlets to keep cylinder temps over 300°F. Ideally, try to keep them in the 350-380°F range during break-in.
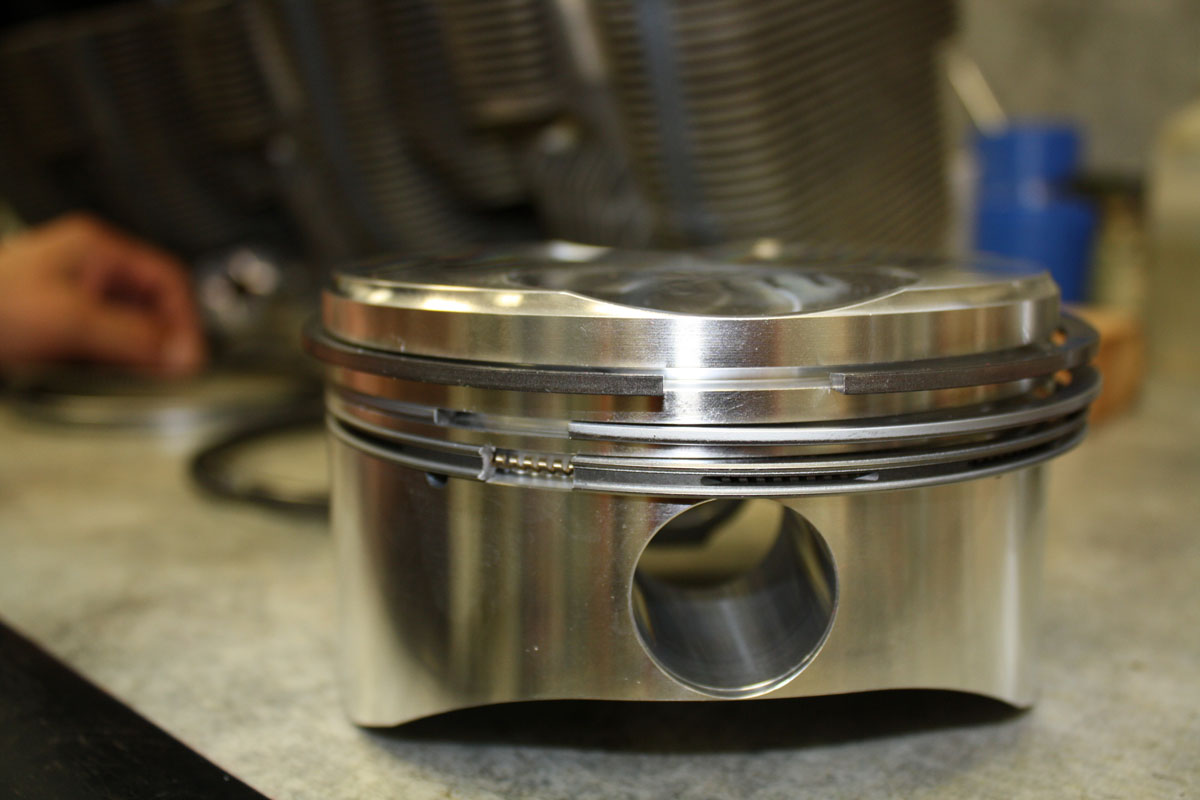
On a micro-level, the cylinder honing procedure produces an angular pattern of sharp ridges and valleys on cylinder walls. A similar pattern also exists on the outside surface of the piston rings. During the break-in period, the rings press against the cylinder walls (when power settings of 65% and above are used) and the peaks collide and wear down until they transform into smooth, rounded humps. As long as excessive glazing is prevented (by strict adherence to correct power and temps) engine oil moves throughout the honing valleys to provide lubrication between the rings, pistons and cylinder walls. Once the peaks round off, wear between the rings and cylinder walls becomes almost non-existent. Lubrication oil is contained in the honing valleys resulting in stabilized, lower oil consumption. With regular oil changes and good maintenance, it takes many more hours (2000-3000) until cylinder bore wear becomes significant enough to warrant cylinder replacement or overhaul.
It is mandatory for mineral oil to be used during the break-in period, plus it is a mistake to think that the break-in of every engine takes place in the same amount of time. Since so many conditions affect ring seating, the times can vary quite a bit, and it is wise to leave mineral oil in the engine until at least 50 hours time according to Lycoming and ECi instructions. Brian Costello, our local Lycoming technical representative, advises us “not to be in a hurry to be weaned off mineral oil” and that it doesn’t hurt the engine to stay on a mineral oil diet through the fist two or three oil changes (50-100 hours). I’ve heard of several examples where ashless dispersant (non-mineral aviation oil) was introduced into the engine prematurely and oil consumption spiked upwards. Sometimes, this can be reversed by draining out the oil and replacing it with mineral, but it may take several hundred or more hours to complete ring seating- if it happens at all.
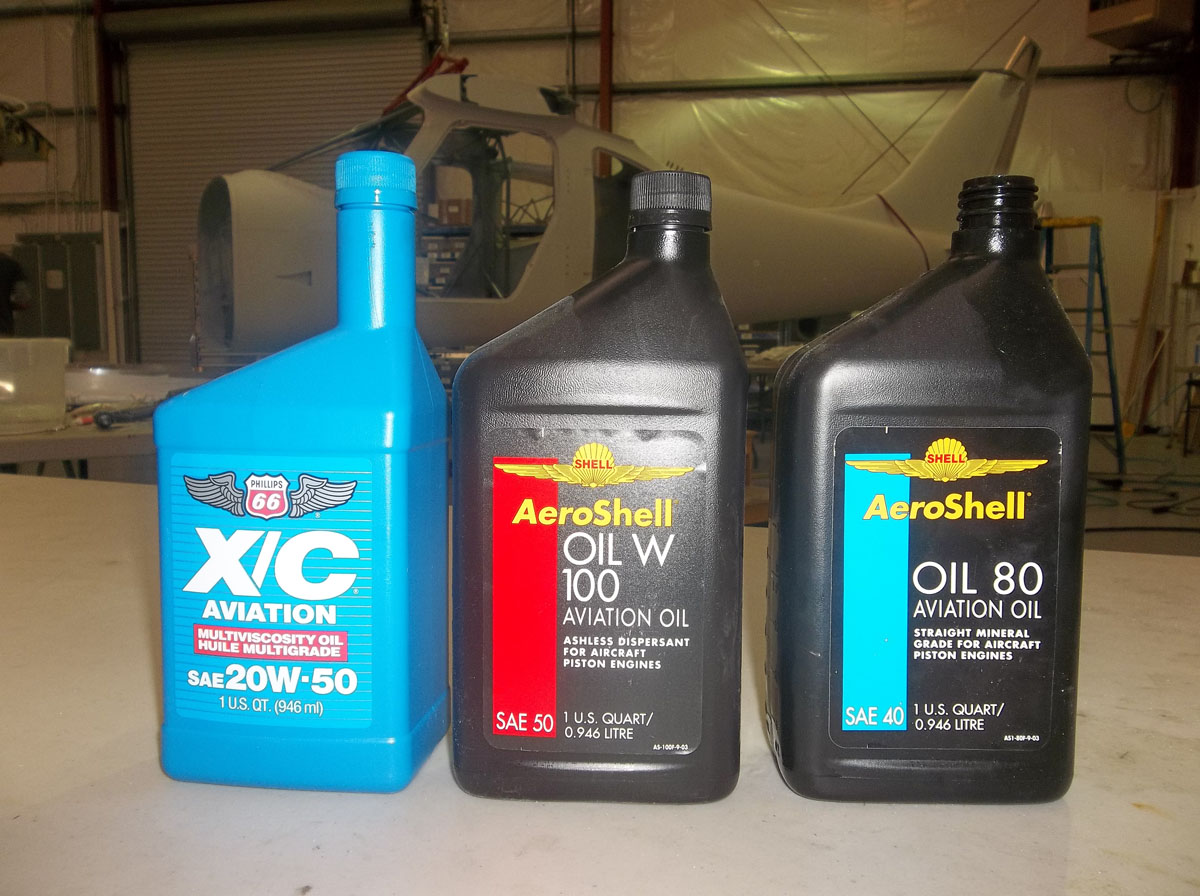
has a red bar. Phillips multigrade mineral oil comes in a blue bottle.
While Lycoming recommends using a (non-ashless dispersant) straight mineral oil for run-in and break-in, ECi and Phillips maintain that X/C SAE 20W-50 mineral oil (containing an ashless dispersant additive) is suitable for break-in and for the entire life of the engine. Their literature states that other brands of ashless dispersant aviation oils contain powerful anti-scuffing additives that should not be used during break-in.
Lycoming tech rep Mike Damiani mentioned that some ashless dispersant aviation oils contain extremely strong lubricity additives that should be avoided during break-in. It’s so confusing that I can see why Lycoming’s position is to recommend straight mineral oil only.
Since my engine had ECi cylinders, I felt comfortable with their recommendation to use X/C 20W-50 oil and had good success with break-in. Like Lycoming, I hesitate to strongly recommend one brand of oil over the other. You will need to make the decision for yourself
A fairly common question we get from TWTT customers is when can I go off mineral oil? The answer can’t be quantified in hours. I typically just pass along the advice we have received: As long as it takes for the rings to seat and oil consumption to stabilize.
So, to know when the oil consumption stabilizes, it is important to record each and every quart of oil that goes in the engine.
With this information, one can determine when the curve completely flattens out if plotting it out on a graph: oil used vs. tach hours. The key word is completely and the only way to determine this is to run mineral oil past the point where you think the oil consumption has stabilized. You need to determine and be confident when the oil consumption is stable.
What is normal oil consumption for a new engine? With Lycoming engines, we typically see 7-10 hours per quart of oil once the break-in is complete. You will hear some owners touting 15 hours or higher, but in my experience that is rare.
Oil consumption note: The quantity of oil required by certification rules based on engine displacement is in some cases higher than practical. Our experience bears out that on a typical Lycoming 4-cylinder engine filled to the 8-quart mark, the crankshaft and connecting rods are thrashing the oil into a thick fog inside the engine, forcing the excess oil out through the breather tube.
Filling the oil to the 6-quart mark seems to be the magic point where the internal engine components don’t whip on the oil.
On deeper, earlier model oil sumps, the oil level can be confidently maintained between 4-6 quarts. On the wider, shallower cold-air induction sumps available from parts suppliers and featured on most new fuel-injected engines, we are more cautious about maintaining the oil level between 5 and 6 quarts. Filling to 7 quarts may be fine on these sumps, but I haven’t tried it in a controlled, record keeping method to determine if it works without introducing breather blow-by.
Lycoming performs a very thorough run-in and initial break-in of its factory new engines (1-2 hours). Since the first hour of break-in is the most critical, they want to assure it is off to a good start. Test data from each engine run is provided with the engine. As a result of these tests, we can relax a little, but I still like to treat the engine as if the first flight was actually the beginning of break-in just to be on the safe side. Note: Cylinder glazing is NOT covered under the Lycoming engine warranty. When it comes to breaking in the engine, you are on your own…so be sure to do it right.
Since we use the Sportsman as our engine “test cell,” we need to make sure it is operationally ready to fly with a thorough inspection. The key here is to have enough confidence in the airframe so you can give much of your attention to the engine on the first flight! If you are flying out of a controlled field, it might be wise to phone or visit the tower to advise them of your intentions and the limitations you may experience with engine break-in procedures and what they can do for you in the event any difficulties are encountered. Be sure to advise them of the urgency to avoid a prolonged taxi and delay in getting airborne. For sure pick a time when the field isn’t busy. With the luxury of an uncontrolled field like Arlington, I will conduct my pre-takeoff checklist on the run as I taxi toward the runway. By the time I reach the run-up area, all I have left to do is check the mags, cycle the prop and I’m ready to get airborne. As a side note—I’m of the mindset that high-speed taxi tests conducted on the runway are best left for brand new designs where the flight characteristics are unknown. I’ve heard enough horror stories of these tests gone badly wrong with many of the popular and proven kit planes that I believe they are totally unnecessary.
Because of the high friction forces associated with new rings, avoid sudden power-on or power-off with the throttle (or prop control). Another reason to bring the power in slowly during the first takeoff is that the governor stop may not be correctly set. This will avoid over-speeding the prop.
Absolutely prioritize controllability of the plane once it leaves the ground. This is the most important thing to pay attention to at first, but once you are comfortable and confident with aerodynamic control, (hopefully by the time you reach 500-1,000′ AGL) transfer most of your attention to the engine…repeat…ENGINE!
Be sure to conduct your flight tests at an altitude of 7,000′ MSL or less, otherwise there isn’t enough pressure generated to seat the rings. Lower altitude is better and since Arlington (KAWO) is 140 feet above seal level, I put the plane in a high/wide pattern, generally at 2,500 ft, within gliding distance of the runway but clearly out of the traffic pattern. Lycoming service instruction1427C suggest running the engine at 75% power for the first hour, then alternate power between 65 and 75% power for the second hour. After that, it suggests running the engine at full rated power for 30 minutes keeping the airframe within its limits. The remaining time should be spent alternating between 65 and 75% (favoring the higher settings) until oil consumption stabilizes.
Engine power settings during the first few hours are where some gray area lies in my interviews between overhaul shops, the engine manufacturer, cylinder manufacturers, combustion engine engineers and other gray-haired flight test pilots. Sifting through the gray, here is what I’ve gathered as common ground:
1) Running the engine harder during break-in gets better results over running it easy as long as the cylinder and oil temps are within limits (keeping in mind ECi’s 400-degree rule which I think is good advice). I operate the engine from 65% to 80% power since we have relatively cool weather in the Pacific Northwest.
2) Power changes are important and beneficial. I’ve also learned this procedure is recommended at least by motorcycle engine shops too. Once when I had a motorcycle engine overhauled, the shop manager cautioned me not to return home via the freeway where he knew the engine would run continuously at the same rpm most of the way. He urged me to take the urban route home in order for the rpm to vary, urging me to hit as many gears and changing rpm as often as feasible.
Once I complete the first several flight hours per Lycoming instructions, I vary power settings more frequently. Since it takes me approximately 5–8 minutes to complete each lap above Arlington’s traffic pattern, I vary the power on each lap. Every time I get to the same point on my “race track” I’m reminded to change the power setting.
3) Doug Hamerton, Tech Support Manager for AeroSport Power strongly urges that the first flight be of at least 1-hour duration.
Short flights run too much risk of cylinder glazing. (I usually stay aloft from 1-1.5 hours on initial flights and descend very gradually with power until I’m on a mid-field downwind.).
He also suggests that if the engine has been sitting for months (or years), to spray the inside of the cylinder walls with oil just prior to running the engine to avoid scuffing.
At the Reno Air Races this September, I met Andrew Higgs from AC Corporation. He was involved for over 25 years with Toyota in Formula 1 race-engine development. I posed questions to him about break-in and the thing he stressed a great deal was they varied the power settings every five minutes until the rings were seated, but especially in the first few hours.
4) Brian Costello, our local Lycoming technical rep, stresses that Break Mean Effective Pressure (BMEP) is what is important during break-in. The higher the BMEP, the better the break-in. Both manifold pressure and rpm contribute toward satisfactory BMEP.
When varying the RPM, it is OK to have the manifold pressure higher than the rpm.
Some pilots still believe that RPM and MP always need to be squared (i.e. 24″ x 2400 rpm) but Costello told me this is an old wives tale they’ve (Lycoming) had to deal with forever. Be careful that the manifold pressure doesn’t get too low during break-in as it reduces the pressure needed to force the rings against the cylinder walls. It is perfectly OK to run say, 26″ MP and 2450 RPM.
Manifold pressure is a good way to keep BMEP up especially if high cylinder temps are encountered. Reducing RPM will have a greater effect on lowering cylinder temperature than reducing manifold pressure. Most modern EFIS screens such as the Advanced Flight Systems have a useful % power figure located right above RPM and MP settings on the screen. Lycoming recommends 65% to 75% power for continuous (cruise) power settings during the life of the engine. For fuel-miserly operators who like to operate continuously at cruise power settings below 65%, there might be a reversing effect over time with oil consumption due to gradual glaze build-up.
For Lycoming’s break-in instructions refer to Service Instruction No. 1427C.
Engine Components Inc (ECi) publishes an excellent booklet detailing its recommendations for engine run-in vs. break-in, as well as a good discussion on engine oil and recommendations. A copy can be downloaded from their website at www.Eci.aero under the tech support heading.
I want to thank Lycoming technical reps Mike Damiani and Brian Costello. Brian is our NW Technical Rep for Textron Lycoming and is our go-to guy whenever we have questions in regard to these awesome powerplants. (Brian and I were once-upon-a-time co-workers at Stoddard-Hamilton Aircraft). For the past 15 or more years he has served at Lycoming, and has done a spectacular job of supporting and educating us about the workings and particulars of the reliable Lycoming engines we fly behind.
Also, thanks to Loren Lemen of Lycon for his contributions toward this article. Loren has over 20 years of experience with Continental motors, 6 years as an engineer, and 12 years providing field technical assistance. Thanks are also due to Doug Hamerton, Technical Support manager at AeroSport Power.
Frequently asked questions
Q: If it takes 50 hours to break in the engine, do I need to do pattern circuits at 2500 feet AGL for 50 hours?
A: No, I only circle the field for 5-6 hours because if anything is going to go wrong with the engine, it typically will happen early. Sometimes I leave the field sooner depending on how I feel about the plane.
Once I begin to see some signs of the rings seating, I can relax a little. After that, I usually feel confident to venture farther from the airport, but keeping it away from densely populated areas as specified in the operating limitations for amateur built planes. I continue flying at 65-80% power settings and varying rpm as I venture away from the airfield, and keep up the variations until I’m sure the oil consumption has stabilized. If correct break-in procedures are followed, oil consumption will usually begin to stabilize within 12-15 hours, but don’t be discouraged or give up if it takes longer.
Q: So, what are the signs to show that the rings are seating?
A: Oil and Cylinder head temps will be artificially higher during the first 1-5 hours as the lions share of the ring and cylinder wear takes place. If you pay attention to the temperatures (I record OAT and engine temps for every flight at certain MP and RPM settings) you will experience a drop in these temps when the rings are seating and oil consumption stabilizes. Typically I will experience reductions of 10-15 degrees on oil temperature and 25-40 degrees on cylinder temps by the 10-15th hour.
The other indication is when the combustion chamber gets “dry”. At first, oil escapes past the rings and gets partially burned in the combustion chamber. If you pull the spark plugs and the electrode is wet looking, the rings are still seating. When the plugs and combustion chamber appear dry (peek inside at the piston top with a flashlight) you can begin to assume that ring seating is well under way. This doesn’t mean that it is finished, since it might be only partially complete. Again, don’t be a hurry to change to a non-mineral oil and fly at reduced power. Re-honing the cylinders will cost MANY dollars more than the fuel savings.
Q: Can I switch to an automotive synthetic oil after I’m sure my engine rings are fully seated and oil consumption is stabilized?
A: Avoid automotive synthetic oil. Lead bromide is a by-product of leaded aviation fuel produced during combustion and is suspended in the oil and circulates in the engine. Mineral and ashless-dispersant oils formulated for aircraft engines are designed to scavenge lead bromide. Straight automotive synthetic oils will not scavenge this material and it will lead to problems.
Aeroshell produces a semi-synthetic oil specifically formulated to meet Lycoming specifications.
Q: I don’t feel like I’m learning to operate the plane much just droning around watching the engine temps and varying the power. When can I safely start doing touch and go’s?
A: Not until you detect indications of oil consumption stabilizing and temperatures coming down. To be safe, I don’t do pattern work until a minimum of 15 hours break-in has elapsed. Even then, to do pattern work you really need the pattern to be nearly clear as you must keep your power up throughout the pattern as much as feasible. Putting the engine through variations in power with pattern work is fine as long as you A: keep 65% power on as long as possible B) don’t make sudden power changes, especially in reducing the rpm.
Q: When should I change the oil during break-in?
A: We change the oil somewhere in the first 5-10 hours and again at 40. ECi’s instructions suggest initial changes at 10, 35, 60 and every 50 hours thereafter. Be sure to cut the oil filter apart and look carefully at the element for signs of metal.
If metal is found (other than a few specks of non-magnetic stuff ) package the element up in double zip-lock bags and contact the manufacturer or engine overhaul facility for further instructions.
Q: What is the best oil to use once a switch is made from mineral oil?
A: Refer to Lycoming Service Instruction No. 1014M if you are using a new factory engine. These instructions refer to oil grades and temperature ranges rather than specific oil brands. ECi’s break-in pamphlet also has an informative discussion on engine lubricants. Aeroshell also produces straight and multi-grade semi-synthetic aviation lubricants meeting Lycoming’s specifications.
Q: Can I lean the engine during the breakin period?
A: This is perhaps the toughest one to answer and perhaps a good topic for a future issue. Leaning aggressively should not be done during break-in as it will cause cylinder temperatures to rise and detonation occurs with near-peak EGT mixture settings at the higher power settings. Leaning a little to smooth out engine roughness caused by a rich mixture is OK, but understanding the causes and effects of detonation is the key to safely leaning. During the break-in period, I will lean a little but my limit is not to exceed 1350 EGT. It saves a couple gallons per hour, but I’m not tempted to go any further than that. Lean of peak engine operation reduces cylinder head temps but also reduces power and without having a thorough understanding of combustion chamber physics, I’d advise avoiding it during break-in.


