Written by Martin Elshire
 I have been in the aviation industry for most of my life and working on general aviation aircraft electronics for the last thirty-four years. I’ve owned several aircraft and restored a Lake LA4-200 Amphibian. Then came the Experimental Aircraft.
After going to Oshkosh in 1996 with the Lake and wandering through all of the experimental aircraft, it was like being in Airplane Heaven! Upon returning, I sold the Lake and purchased a Cozy MK IV pre-built and did a lot of modifying on it to meet my own wants.
But that wasn’t good enough. I had to build something. I did lots and lots of research and the thoughts of the fun I had with the Lake convinced me that I wanted an aircraft that I could someday put on floats. The Glastar came to mind and while on a business trip to Stoddard-Hamilton Aircraft Co. I flew one for the first time and wanted it.
My wife and I talked about it several times over the next year without arriving at a decision. In January 1998, while on another business trip to Stoddard-Hamilton, I flew the Glastar® again and made up my mind to buy it, so that’s what I did . . . Without my wife’s knowledge. Of course, rumors traveled faster than we could drive back to Billings and by the time we got home, she had heard that I had bought a Glastar.
I received the kit in February and started building February 22, 1998.
My goal was to fly January 1, 2000, so I worked 20 to 40 hours per week when I wasn’t at one of the air shows. I averaged 20 hours per week. If I missed, I had to make it up. (I was a real taskmaster when it came to working on my airplane.)
I stayed on track until Oshkosh 1999. While setting up our display, I injured my neck and after the show, had surgery. This really threw my building schedule off and more or less messed up my plans. My new goal was to finish before Oshkosh 2000. In March I had about 1200 hours into the kit and figure I’d have about 300 hours to go, not counting painting the aircraft. Two things really slowed the progress, moving the plane to the airport and the effects of surgery.
I live in a “billable hour world” so I’ve kept track of all my hours on the aircraft as though I had to bill it out. I’ve also taken pictures of the entire project and put together a book (baby book or diary, if you will) documenting the complete construction of the aircraft from first receiving the kit to when the first flight happens. My “Aircraft Diary” includes pictures of every step and a description of work accomplished and time spent on an almost-daily basis. Stoddard-Hamilton used my book in their booth to show prospective builders what it takes to build a Glastar.
I worked with many experimental aircraft builders and asked lots of questions about what they would recommend and what tools were needed, I also started listening to some of the complaints on building.
Some things I feel are a must. You need tools, lots of tools, and more tools—drills, rivet guns, small brake, shear, roller, clamps, clecos, and all the normal shop tools. Did I mention you need a lot of tools? I’ve always been a tool nut and it really paid off in allowing me more time to spend building and less time spent looking for the right tools.
I think that it’s best if you can build the kit at home. My plane was about 30 feet from the dinner plate. That made it real sweet to get up from the table and go to work. I kept the aircraft at home for as long as possible and finally moved it to the airport. It now takes more planning to get the time I want to work on the project than before, and then it doesn’t always work out. One way to accomplish this goal was that I swore off Television for two years (at least until my neck surgery).
I also spend a small amount of time on the Internet reading the information in the Glastar’s web page – I read a lot and say nothing. Good things come from the information that gets posted; you just have to use what you want. I also use the Builder Support at Stoddard-Hamilton and try to get all my questions answered all at once.
All my life I’ve been very mechanical-minded and meticulous, therefore, I’ve been able to keep my workmanship to a very high quality. In my business, things have to be perfect and it’s no different with my personal aircraft project.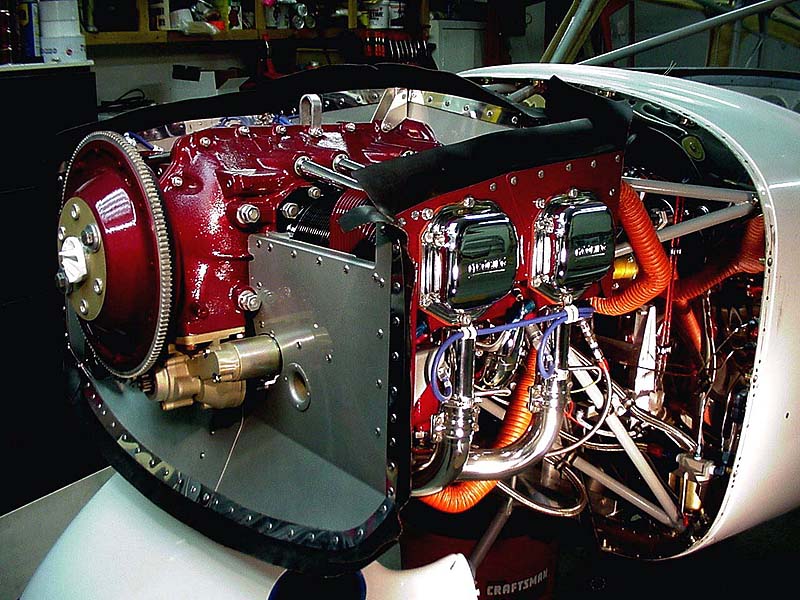
My engine compartment was a real challenge, having never before mounted an engine and the manual’s one page of instruction said to install firewall forward. I started looking for an engine and found one that needed to be rebuilt. I had a local shop, M.A.C. Engines, build up the engine for me. When I started to install it, I spent lots of time at the airport looking in every cowling that was open and taking lots of pictures. At several of the EAA Shows we go to, I also asked lots of questions and again took lots of pictures.
Then came the day to start.
I spent many of my younger years building show cars. So, I got started with chrome intake tubes and valve guide tubes to dress it up a little. I couldn’t stop there so that led to polishing the firewall and exhaust system. Before I knew it, I was polishing every rivet that went into the baffling. When it was finished, my engine builder said “You don’t even want to put oil in this.” At that point, I had to keep the same quality up for the cowling and the rest of the firewall forward. I know once I start it, it will get messed up and it will be hard keeping it looking real good.
Back to the builder’s manual – The Panel Installation part says just about as much as the firewall forward part.
However, I’ve got one up on that part. I’ve been building and installing panels for 34 years. With a newly designed panel to fit into the Glastar, I set my goal to make it as nice as the engine compartment.
I’ve been a real II Morrow (now known as UPS Aviation Technologies or simply Apollo) fan for years and have worked very closely with Ray Morrow and everyone at the factory. So my decision on what brand avionics to install was made. I also work very closely with Vision Micro Systems and know how reliable their equipment is so the engine instruments were a no-brainer. I wanted to protect my investment in time and money firewall forward.
The panel turned out the way I wanted it, and with our “Plug & Play” configuration, I can take it in and out in a very short time, and pretty easily. Something most builders find out: Put it together, Take it apart, Put it together, Take it apart… Once the panel goes in for the final time and all the hoses and the Pitot Static system is tied in, then it won’t be as easy to get out and I don’t ever plan on removing it again. I built the panels for easy future maintenance.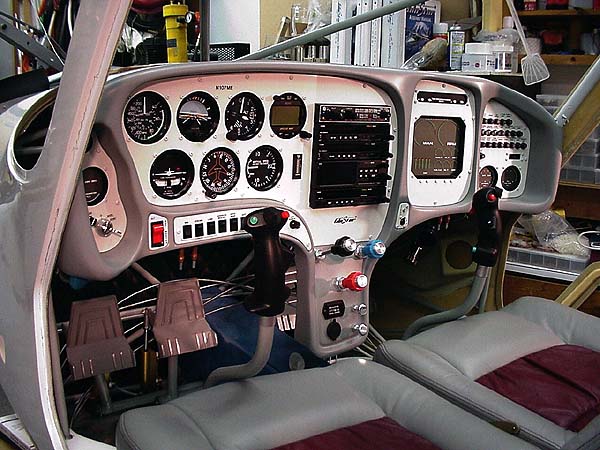
I’ve had several chances to fly 4 other Glastars since the first flight in 1997 and they all seem to fly the same. That told me that the Glastar I’m building should be a real solid aircraft. The last flight with the new Glastar Demonstrator Aircraft at Arlington was not a demo; it was just to enjoy the aircraft. It’s one of the things every builder needs to do about 80% into the kit to get them rejuvenated.
I could hardly wait until I get it in the air.
My plans were to fly the aircraft and get all the bugs out, fly the time off and then paint it. I’ve worked with so many builders that have painted their aircraft and started flying and have had paint crack and small things happen to their finish. It seems that most builders that wait are happy with their paint jobs. I’ve made a few minor changes to the kit, but in general, I’ve stayed with the way Stoddard-Hamilton designed the kit. It’s really straight-forward, with only a few questions to ask.
I’ve also become involved in our local EAA Chapter and have been President of our Chapter for the last three years. One of my goals was to have an educational program at every meeting and I’ve been very successful at accomplishing this. As I’ve been building, I’ve found things that I’ve needed to know about, so I’ve made
arrangements to have professionals come in and speak on various subjects. That way, everyone in the group can enjoy and learn.
Overall, this has been one of the most exciting projects I’ve ventured into in the 34 years I’ve been in aviation. I’ve gained a lot of good friends all over the country that are building Glastars. A couple of them even helped get me through the two months
recuperating from surgery when I couldn’t even go to the garage to look at my project . . .Lots of camaraderie.
Then in January, one year after my original goal. It was time for the inspection and first flight. I work with the FAA real close so I figured that they would just come in look around a bit and sign it off. NOT!!!!
The inspector looked in every hole, under the seats, inside the engine compartment and about everyplace you can imagine. I only had a few squawks.
The weather was cold in January so it was hard to find time to run the engine, and do all the test required. On the morning of the 14th I called one of the EAA chapter members that worked in the tower and we got a plan together. First I gave the engine the last static run then checked it over real quick, then off to the runway.
First trip I got to about thirty eight mph and burned in the brakes, then the next high speed taxi I got to a little over forty and could really feel the controls. The plane wanted to fly and had good pitch and roll movement. I could move the stick all ways from center and would get good response and in center the aircraft would just stay on the ground. I had some trim down attitude.
After that taxi my friend in the tower wanted to know what was next, I said lets put this thing in the air. Down to the long runway I went and asked if he had done his part. Before we started he said he would have the Crash Fire and Rescue stand by. My friend said everything was a go and cleared me for takeoff. Boy what a charge, at 45mph I pulled back on the stick and it flew just like all the other Glastars® I’ve flown. I flew for one hour and stayed just north of the airport just in case I had to get it back in the ground.
I now have just over forty hours on the ‘Star and haven’t had to do anything to it, Trim is perfect, no trim tabs. My speeds are where I wanted them to be, real close to the advertised specs.
The only thing with this plane that is hard to explain is the feeling that goes over you when you fly something you built yourself.
Total time in building the Glastar® up to the day of the first flight was 1535 hours; I still have the paint and interior to finish. I really like the aluminum wings and everyone says to polish them and not paint. All I really want to do is just fly and enjoy it till this fall and then I will make the decisions on paint.
Martin Elshire is one of the owners of Aerotronics Inc., an avionics shop that has built panels for many GlaStar owners. He is based in Billings, Montana.


