I’ve had a Lightspeed EI (LSE) on my right side and a Slick impulse mag on the left. Both have performed with no issues for over 1000 hours. The Slick’s been overdue for an IRAN so I decided to upgrade to all electronic with a PMag.
Hardware received: PMag unit, short reach auto plug adapter kits, auto ignition harness, short studs, “non-impulse” certified gear. All told, the cost was around $1700.
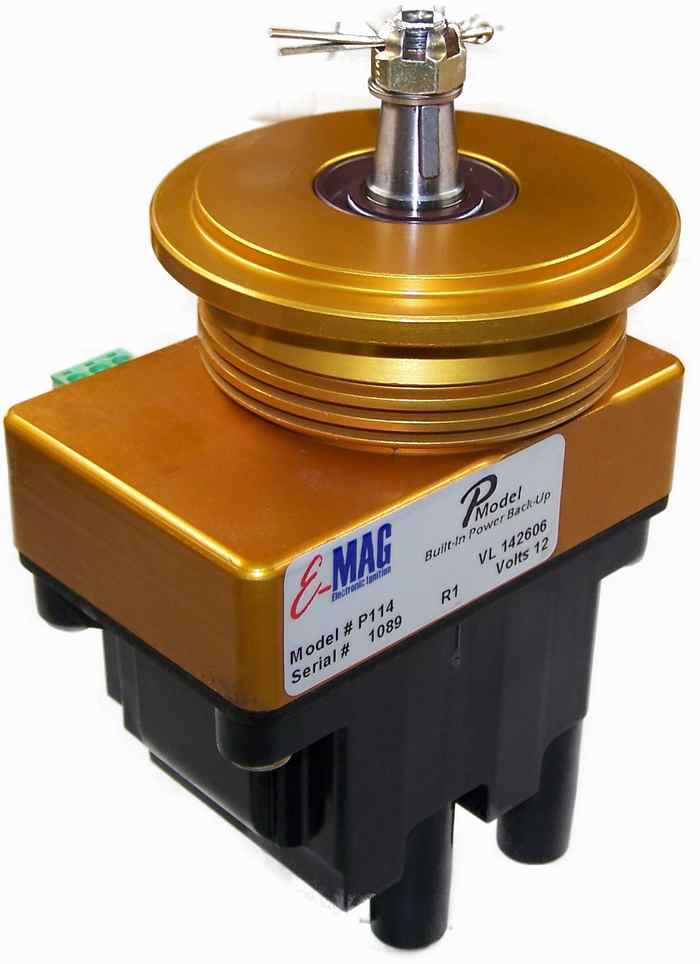
The mechanical part of the install was relatively straight forward. Remove the Slick mag, ignition harness, spark plugs with all the associated tie-wraps, clamps, etc. Since the left mag was an impulse mag there was a 1/2” spacer mounted between the mag and the case. The impulse gear is not compatible so you have order a “non-impulse” gear ($185). Because of the 1/2” spacer, the studs are longer than needed for the PMag installation. Removing those studs from a 15-year-old engine proved to be the hardest part of the job. A tight space, oil lines, scat tubing and all the usual assortment of tie-wraps, safety wire and sharp edges pretty much shredded my right hand. Once the new studs were installed the PMag mounting was straight forward. It can be mounted at any angle since the timing process is “computer driven,” not mechanical. I did not specifically weigh the units but overall the felt PMag much lighter that the Slick it replaced.
The wiring is straight forward, but you need a dedicated 12 V line and ground to the unit. I had a bit more work to do since I wanted to feed the PMag’s serial data into my computer system and be able to configure it on the fly.
The PMag tach signal and my EIS 4000 took some troubleshooting. Originally the EIS used the mag’s p-lead as a sensor through a resistor to read RPM. That had to be all sorted out and undone which took a lot of “upside down” time (if you know what I mean).
Ultimately, running the tach output line from the PMag into the EIS tach input worked fine.
Because the PMag fires at both TDC and BTC you have to change the EIS’s tach P/R code to detect 2 pulses/revolution.
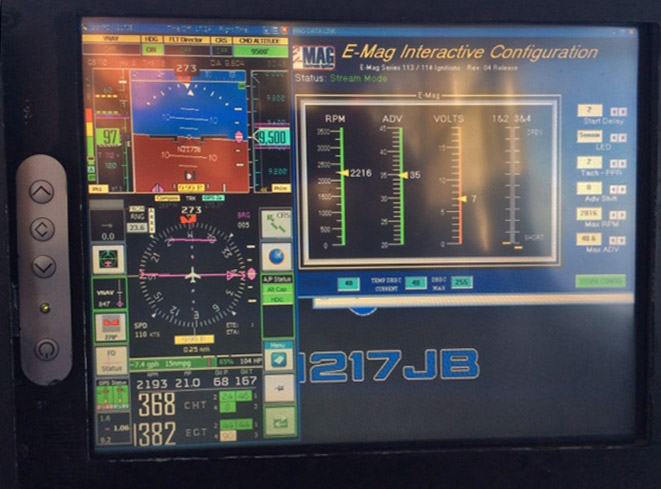 The setup, timing and testing are all very straight forward. Very easy in fact. I’m using NGK BR8ES (Stock # 3961) plugs. The EICAD software that you can use to monitor and configure the PMag gives you lots of options.
I won’t get into it here but there’s good documentation online: www.emagair.com
So, once everything was installed and seemed to be in working order it was time for a test flight. My first impressions: very slight RPM drop (~50) when going from both to PMag only. I get no drop with LSE only. The PMag self power test showed that at around 850 RPM the unit would quit making sparks.
The engine did not quit completely but went into a dieseling mode like my old Rotax 447 used to on occasion. Grounding the ignition switch brought everything down normally.
I’ve only flown once and as predicted my CHTs seemed higher and got hotter a lot quicker. It did feel like I had a bit more power too. I’ve always had high CHTs (420-430) on climbout and I’m planning to redo my baffling soon. Maybe that will help some. It’s nice to be able to set the advance dynamically. At cruise I was able to match the advance curves between the LSE and PMag so that there was virtually no RPM loss while switching between systems.
I’m quite pleased with the results so far. Lighter weight, self-powered, easy setup, better spark, cheap plugs and programmability. If the PMag proves to be as reliable as the LSE has been it is definitely a worthy upgrade.


Since doing this a couple of years ago, did you get the high CHTs sorted out? Did you see any decrease in fuel flow? Are yo happy with the conversion since?
CW
Carlos is no longer with us. Has flown west.