 Making ribs is a simple process not requiring more than what is found in a standard wood shop. You will need a oak form block, a plywood clamp block, a sheet metal flat template and some aluminum rib material stock. Ribs are relatively simple to copy and will take you only an hour or so to make after the wood form tools are made. Your goal is to match the airfoil shape exactly and not make any cracks during forming. Here is how.
Materials
- 1″ thick (actually I think it is 11/16″)
- 1″ thick plywood
- 3/16″ metal dowels
- Metal for template
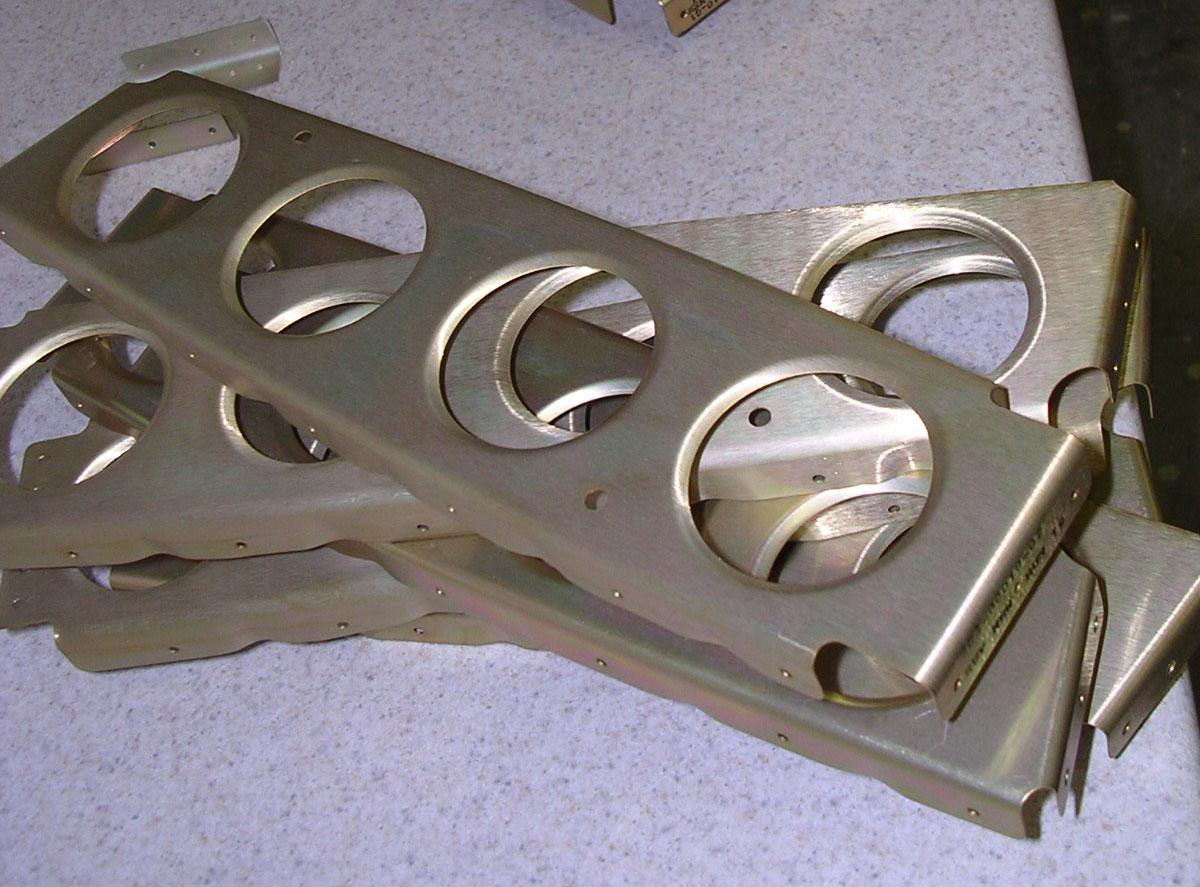
- 6061-T6 aluminum the same thickness as rib (plan on throwing the first one away as a practice part). I used a local metal supply house who also sheared the blanks. $65 for 16 Main rib blanks. 6061-T6 is a common material.
Tools
- Saw (Scroll or band saw)
- 3/16″ drill
- Bench top belt sander
- Soft-faced Mallet
- Fluting pliers (see below)
- Marker
- Pencil
- Aviation snips.
- Deburring tools
- Protractor or something to set the sanding table to 7 degrees
- Router with a 1/8″ radius corner bit or something that will make a uniform 1/8″ radius on oak.
- Hole cutter (MAYCO brand from Avery for a lot of holes)
- Lightening hole flange forming tool (Avery)
Making the form
- Take an original rib and make sure the flanges are square to the web.
- Lay the rib on a piece of red oak and scribe the rib pattern carefully onto the oak.
- Mark the locations of the tooling holes. (No need to mark lightening holes)
- Saw the oak and carefully sand to the line making sure the edge stays square to the face of the oak.
- Check the oak to the original rib to ensure it is the same. It should be within 1/64″ to the original airfoil profile.
- Carefully mark a line (I used a felt pen) the same thickness as the rib stock you are going to use.
- Resand the edge to just remove the line mark.
- Check the contour against the original rib.
- Temporarily remove the flutes in the original rib.
- The form block should just slip inside the rib without any gaps and without pushing out the flanges. It should be a very close fit to the airfoil shape. This is critical, especially at the leading edge.
- Choose which flange (left or right) rib you are going to make.
- Use a router and route an 1/8″ radius on the oak. (Now the form block should fit well in the original when clamped)
- Darken the edge of the oak with a pencil.
- Set the table on your bench belt sander to approximately 7 degrees for spring back allowance.
- Sand the edge up to but not including the 1/8″ radius.
- Drill 3/16″ diameter holes at the tooling hole locations. (If you use a right flange to make a left flange form block, make sure the hole is very perpendicular since you will have to install the tool pins on the opposite side of the oak from where you marked it. If you miss a little, not to worry. You can adjust your template to match)
- Install 3/16″ tool pins. I used metal dowels. You can use drill bits.
Making the clamp block
- Make another wood block the same as the oak one except out of plywood and 1/16″-1/8″ smaller all around.
Making the template
- Make a metal flat template by scribing from your original rib with tooling holes and lightening hole locations.
- Add enough material for flange width plus about 1/4″ all around. Scribe your bend relief (notches in the ribs) the same as the original rib.
- Cut the templates to the lines.
Making the blank
- Mark a blank piece of 6061-T6 aluminum using your template. DO NOT SCRIBE OR SCRATCH THE BLANK.
- Trim the edges, drill (punch) the tooling holes and smooth and deburr notches while flat. (Do not cut lightening holes at this time.)
Forming the rib
- Sandwich the aluminum between the oak form block and the plywood clamp block locked in position with the tooling pins (at this point, the blank must be securely positioned by the pins).
- Clamp the whole mess in a vise adding extra wood clamps if needed.
- Use a soft faced mallet and quickly form the flanges over. Don’t be shy here. The fewer hits used will prevent cracks and minimize dents. The edge of the mallet face should strike the radius of the rib flange as it is being formed over.
- The flanges should be square to the face with the 7 degree springback allowance.
- Check the form radius carefully for cracks. The radius should be smooth to a slight orange peel surface. (best is smooth and is easy to get on .032″ 6061-T6 with 1/8″ radius)
Finishing the rib
- Remove the new rib and trim the excess flange material.
- You will notice that the rib web is bowed after forming the flange. Remove the bow by fluting at the same location as the original.
- Use fluting pliers and flute the flanges. You can flute using tape covered jaws on a needle nose pliers or get fluting pliers from Avery. Needle nose pliers can produce a flute identical to the original. Avery flutes are smaller but good.
- Cut the lightening holes and use a lightening hole forming tool from Avery.
Your block and clamp can make approximately 20 ribs before the form block edge and radius starts breaking down.
Advertisement


