 Joining the fuselage halves: In addition to taping the belly and dorsal seam as per manual, I screwed tongue depressors (one #4 x 3/8 sheet metal screw each side of the joint,having predrilled holes for screws with size 40 bit) across the seam at 8-12″ intervals to help maintain perfect seam alignment. (even with the tape it could go up and down a little, in & out of alignment) When the resin has hardened back the screws out and fill the holes with resin & micro when finishing.
–Paul Hansen
Step 21- laying up the belly seam: This is a suggestion for an alternate way of working with the fiberglass. in general, always do your saturation between two pieces of thin plastic, (2-3 mil) spreading the resin first with a tongue depressor, and then using a squeegee to press and work the resin into the cloth. 2 layers can be done at once this way. Note: I did the belly seam in two sections. Front–about 80 inches, aft 130 inches with a 2 inch overlap. Easier to work this way, and not quite so frantic ini terms of gel time!! Here’s how to get the belly seam on without getting it all over everything!!
- Cut a long piece of 2 mil plastic (from plastic drop cloth) a little longer than your DBM tape. (You may require 2 or more pieces to accommodate). Cut about 10″ wide with one edge being a fold.
- Open the folded plastic. Lay DBM tape on one side & pour a bead of resin down the length of the tape.
- Spread the resin gently with a tongue depressor, and fold the other half of the plastic over on top of the tape. (You now have plastic on both sides of the tape and can work with it without a horrible mess!)
- Now using a squeegee to press the resin down into the tape and out to cover the dry areas, continue to work it till the tape is wetted out (it will look clear.) You will no doubt have excess resin which can be squeegeed out toward the fold and then pushed to one or both ends and squeezed out into a separate cup (don’t mix with other unused resin…this will set up quicker and can be used if really needed, but better not). Note- while one or more persons is doing this, the other should paint on a thin layer of resin on the slot there the tape will go.
- Now use a rolling cutter (available at any fabric store) [looks like a pizza dough cutter – Sid] to cut off the plastic within about 1/4″ of the DBM tape, both sides. Caution: Be sure to dissemble and clean it in lacquer thinner or acetone to remove all resin or it will be ruined forever! Now roll up the tape (still between the layers of plastic) mat side out. Transfer to the fuselage. Slide in from the AFT end of the cage (the shorter section of tape). When it reaches the fwd gear socket cross tube, peel back the bottom plastic sheet about 2-3 feet, and continue to slide it fwd down the slot till you reach the fwd edge of the shell. Press that portion down into the slot and stretch out the balance aft, with both pieces of plastic still on. Now you can easily peel the bottom plastic off the rest of the way. Position and press the tape into the slot. When it is stuck down, then peel off the top plastic and stipple as per manual till all air bubbles are gone.
- Repeat the procedure for the aft section. Or, if you are brave and have lots of help and decide to do it all in one piece, roll it up from both ends, rolling about 6-7 ft for the forward section and balance to aft. (Roll it matt side out – that is what goes down).
Remember, peel off bottom plastic first, position and press in place, then peel off the top plastic and stipple. Works beautifully. You will use much less resin this way. (HOORAY! LESS WEIGHT!!) I used only a total of 500 grams (a 200 and a 300 gram batch), instead of the 750 suggested in the manual, and still threw away at least 100 grams, maybe more. [Ed. note- you may want to use peel ply on this as well]
–Paul Hansen
Step 21: For ventilation, I used an old box fan, placed in the aft cabin area, pointing aft. This kept a large supply of air blowing aft and out the tail cone, actually slightly pressurizing that area and made better breathing than otherwise possible.
–Paul Hansen
Aft struts and forward shell attach fitting lay-up: The fuselage struts (Step 85) and the forward shell attach fittings (Step 32) would be a lot easier to install while the aircraft was upside down. You might consider installing these parts after the dorsal seam has been laid up (Step 24) or alternatively turn the structure upside down a second time when you are ready to install these parts.
–John Top
Fuselage bonding: I just seamed my fuselage belly using Paul Hansen’s method and did this by myself with no problems at 80°F Thanks Paul I potted in my hardpoints with mixture of Qcell and mill fiber- tooth paste consistency- I had no problem with the exterior cracking when tightening the screws – my guess the problem for some may be over tightening and not filling the void entirely – I did what Jim Siebel suggested – i.e. drill a small vent hole to vent air and extra Qcell. On those few hardpoints that are at angles-use a thick Qcell mixture with a waxed screw around the nylon washers-tighten after the Qcell sets.
–Dan White
Fuselage bonding: Today I glassed the belly seam, with the help of my wife and friend and fellow GlaStar builder Scott Fifield. Using 60-grit paper, we sanded the joggle (again), then cleaned it well with acetone, before applying the resin. We more or less followed the SHAI & GSNet tips and did the seam in two sections: front and rear. To slow the gelation time of the resin, I put it in the refrigerator for about 3 hours before I catalyzed the necessary amounts. Using 0.75% MEKP, and an air temperature of about 60 degrees, the resin “kicked” in about 1-1/2 hours in the pot, and in about 3 hours on the seam. I had plenty of time! I was very worried about being able to accomplish this step. For those of you who have yet to face that step, don’t worry, it works!
A tip: Tap Plastics sells a little roller designed just for glassing. It looks like a miniature paint roller, with a “roller” that is made of hard nylon with a raised spiral pattern on the surface, and is about 4-inches long. Using that to roll over the top of the peel ply (from the center to the edge) allowed the glass to be smoothed down and it easily pushed the air bubbles and excess resin out.
–Dennis Douglas #5220
Antenna cable installation caution: Very early in the fuselage assembly section, like step 2 or 3, has the builder glass in the VOR antenna cable on the port fuse half, back near the rudder spar joggle. IF you do this, stop the glass about one foot above where the fin contour changes to the fuselage. The reason is that later, in step 50 something – when you install bulkhead C, the extension on the bulkhead will want to stick up into the fin and if you have the cable glassed down there, it won’t fit without some work.
–Dennis Douglas
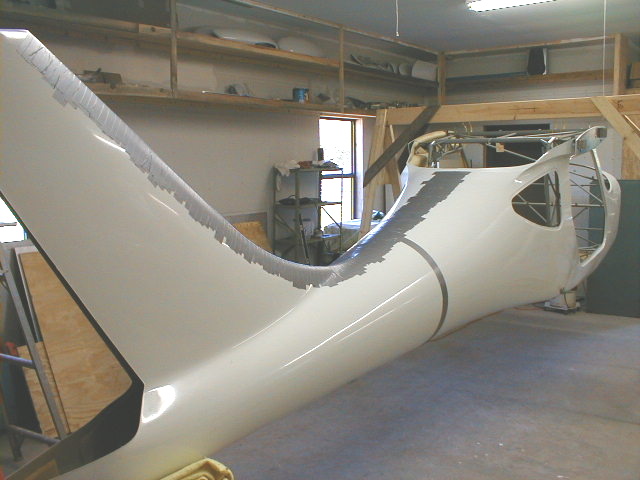
Joining the fuselage halves: I had great difficulty getting the two shell halves to stay together, let alone aligned, so I could glass them up. This was mainly because one fuselage shell was about an inch broader than the other (measuring vertically between the top and bottom seam just forward of the baggage door). Also, when I initially brought the two halves together, the tail end was about an inch off the centre-line, measuring with reference to the string line, which is centered on the cage structure.
Tape just wouldn’t hold the shells. I tried Formica strips and impact adhesive, also without success. In the end, I straightened the fuselage by bracing it at the front and just behind the baggage door, and using a scissor jack to lever it across at the tail end. I then pop-riveted a 1″ x 1/2″ aluminum angle on the outside of the hull the length of each long seam (1″ flange against the seam), with pairs of rivets every 4 – 6 inches either side the seam. I positioned it as close to the seam as possible with the manufactured heads on the inside (ie. pulling the rivets from the inside). I also used hot-melt glue to keep the seam edges tight against the angle flange where necessary. I then glassed the seam laminates per the manual (over the manufactured heads) and, after curing, cut-off/drilled out the formed rivet heads from the outside and removed the angle. Obviously, I have to make good the empty rivet holes and the manufactured rivet heads will stay under the glass. The fuselage, which started out like a banana, is now perfectly aligned. One advantage of riveting the two halves together as described is that the structure was very solid and robust for glassing, and there was no possibility of joint slippage which tape, in my case, would have been unable to prevent.
The fin was also a pig, as one side of the leading edge was slightly more curved than the other and so would insist on popping inside the other half when I tried to tape it up. I didn’t want to try riveting along that curved leading edge, so I kept the two halves apart with small pieces of scrap aluminum, then glassed about a dozen inch wide DBM strips at intervals along the leading edge seam (inside of course). Once these had cured, I could remove the aluminum scraps and lay the seam laminate proper over these small bandages, which were now holding the leading edge joint in proper alignment.
I hope this helps those of you who have not gone for a jump-start. Joining the shells can be tricky, but at least if you do it yourself you can get it right!
Peter Howard, #5521


