 Riveting the top skins to the aileron nose ribs as described in the builder’s manual is pretty awkward (if not impossible) for solo riveters, and probably not too fun even if you have a helper. The rest of the aileron is fairly easy and straightforward to complete, but the tops of those nose ribs is the crux. Others have described some alternative methods for doing those nose ribs, but here’s the one I devised and it was quick and easy to implement, and worked beautifully (for solo riveting).
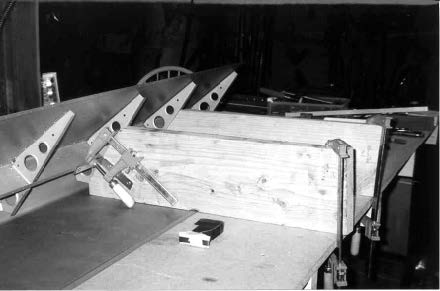
Instead of clamping the aileron spar to the edge of the worktable, and having the bottom of the skin hanging down over the edge, I flipped the whole thing over so that the bottom skin is clamped securely to the table, with the skin nose approximately even with the table edge, and the top skin (with spar and ribs already riveted in place, as per the instructions) pointing UP. This allowed easy access to the tops of the nose ribs with a bucking bar, except that the top skin and spar were now dangling somewhat loosely above the table, not well supported for a quality riveting job. To support the spar, I made a couple of wooden supports from 2×10 scrap lumber, as long as the worktable is wide, and beveled the nose of each piece at a 55 degree angle. These were clamped to the top of the worktable, on top of the aileron bottom skin, perpendicular to (and contacting) the spar, spaced a foot or two apart on each side of the area to be riveted. At the nose of each wooden support where it contacted the spar, I attached a 4″ steel angle bracket positioned in such a way that one side was flush to the spar and could easily be clamped to the spar. I also had to rasp a small notch into the edge of the wooden support where it would otherwise have contacted the joggle on the skin bottom (where the support and skin were all clamped to the table top).
To actually use this:
- Clamp the aileron skin to the worktable as described above (I used one bar clamp at each end of the leading edge).
- Position each support, clamping the metal bracket to the spar (small bar clamp), and the opposite end of the wooden support to the opposite edge of the worktable (long bar clamp).
- Rivet away.
- Reposition for the next nose rib and repeat as necessary.
A related issue, not mentioned in the manual, is how to actually pull and bend the skins into position while riveting those top 5 rivets on each nose rib (much force is required). The first 4 rivets are supposed to be bucked rivets, and the 5th one a blind rivet (due to the difficulty of positioning the skin, and accessing with a bucking bar). I found that it worked very well to (a) first rivet the first 2 holes, just forward of the spar, in each nose rib; no problems there with skin positioning; (b) turn the whole thing over temporarily, and pull and cleco the bottom skin into position, just like when it was first drilled; (c) now place rivet #5 (the blind rivet) in each nose rib; (d) un-cleco, return everything to the original setup, and buck the 3rd and 4th rivets, with the skin now held securely in place by those blind rivets.
One more note—followed other builders’ suggestions about using flush rivets in the top of each nose rib for the 2 holes immediately forward of the spar, to avoid possible interference between those rivet heads and the trailing edge of the wing skins (I don’t know if that was actually ever a problem with some planes, or just a hypothetical concern, but that mod received the John Coussen’s blessing over a year ago, so I did it “just in case”). If you do this, remember to dimple those holes before doing any case”of the riveting.


