Trim the fuselage cutouts for spars a little more than you think you need to. Pin and bolt the spars to the cage; slide the strut on the strut attach arm; position the fuselage strut attach fitting next to the cage while one person raises the wing tip and another person observes the strut at the strut attach arm so the wing tip isn’t raised too high (you are actually raising the tip much higher than it will be when done); when you get the right angle, the strut will slip on to the cage and you can insert your AN8 bolt through the bushings. My strut was 0.5″ too long. After trimming the strut, I drilled holes by the manual. When reinstalling the wing, I followed the same procedure, but I inserted the inboard bolt at the strut attach arm from below when the holes lined up as the wing tip was being raised. Then I put in the outboard bolt head up, pulled out the inboard bolt and put it in head up.
–Don Hatler
Here is a quick and accurate way of locating the holes for drilling the upper wing strut. It saves a lot of measuring and other induced errors. All that is required is a piece of oak and the drill fixture from S-H. As shown, the pin and drill locate the oak fixture and when the strut is installed and centered on the 1.75 line, a hand drill is used to mark and locate just one hole. Then the strut is removed and the S-H drill fixture is slipped on and centered on the drill mark and drilled through. Very accurate and easy to do the job.
–Jim Rose
Wing strut drilling and dihedral: You will have difficulty getting the dihedral exactly at 1.5° if you use the plan outlined by S-H. The bolt holes on the top and bottom of the spar WILL NOT align if you use the S-H jig and drill all 4 holes at once.
- Use a Smart level, there’s no other way.
- Use turnbuckles hooked to overhead eye-bolts with light chain hooked to the front and aft wing spar. The links in the chain provide gross adjustments and the turnbuckle allows fine adjustment of the dihedral and zero twist.
- Drill ONLY the upper distal (outer) topside hole in the spar after making the measurements as outlined to find the center of this hole. Use S-H jig for this hole.
- Reinstall the spar and insert a bolt in this hole.
- Measure the dihedral and twist again. If you’re right on, skip step 6.
- Slot the hole with a rat-tail file until you get exactly 1.5° and zero twist. This may take several tries.
- Use the newly determined center of hole at one end of the slot and use the S-H jig to drill the other hole on the top ONLY of the spar.
- Reinstall the spar and put the bolt in the first (distal/outer) slotted hole. Hopefully you now have exactly 1.5° of dihedral.
- Ream the proximal (inner) hole and then drill through the bottom of the spar using this hole as a guide. This will give you perfectly aligned holes in the spar.
- Repeat step 9 in the outer hole.
If all goes well you have only one slotted hole which the head of the bolt covers. Mine had to be slotted about 1/8″ to get exactly 1.5° of dihedral on each wing. Good luck. [NOTE: Concern has been expressed regarding slotting the hole with a rat-tail file from an A&P. He is very concerned that people not do this. –Sid Lloyd]
–Roy Kokenge
Wing strut installation: Capt. Bill and I drilled on the wing struts, today. It took us around 6 hours. The drill jigs that S-H supplies worked pretty darn good. On the second strut, we had a slight misalignment of the outboard hole. We disconnected the strut at the bottom and twisted the strut slightly and the bolt went into place. On the first strut, the bolt fit perfectly. I did notice that the fiberglass sleeve (with the drill guides) fit very well on one strut but there was a little “wobble” for and aft along the cord line on the second strut. Can’t explain why, that’s just the way it was. This may be where are slight misalignment may have come from. If I had it to do over again, I would put tape shims on the strut to hold the cuff steady and in one position. The reamer seemed a little large to me. I was expecting to have to lightly tap the bolt into place but it went right in. The bolts called for are AN6-24 but these leave a lot of exposed shank, possibly to take into account the thickness of a tie down fixture. An ideal set up would be for S-H to do the wing to strut drilling, etc. and have a threaded fork at the fuselage end of the strut like the Piper high wings do. This would save a lot of time and lessen the chance for “slop” in the installation and would make it very easy to arrive at the correct dihedral. By the way, we rigged the wings at 1.6° and when we were done and the weight of the wings was on the strut we were at 1.5°.
–Bob Skinner
Strut drilling: I used Mike Allardyce’s method of locating the strut hole for strut drilling. It worked great for me. He described the method some time ago, which was essentially as follows. Install the strut and place a small 0.020″ sheet of aluminum on top of the strut and over the strut attach arm. Bend small tabs in the sheet and clamp it to the strut beam. Remove the strut and drill a 11/32″ hole through the sheet from the bottom of the strut attach arm (inner hole only). Reinstall the strut and set the dihedral, mark the strut for drilling using the hole in the sheet as a guide. You can get the centerline from the S-H jig. The hole in the sheet is EXACTLY above the hole in the strut attach arm. Mike’s method for locating the strut hole is similar to the the method that Jim Rose posted in the archives on 8/4/98 on installing and drilling the wing struts.
–Ivan Kaiser #5137
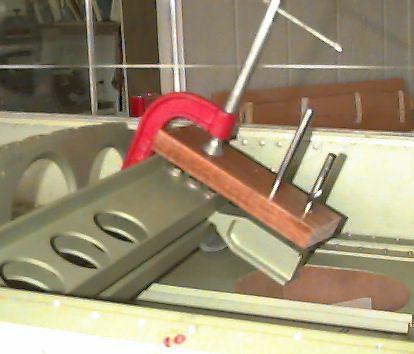
Strut drilling jig: The strut drilling jig is simply a device to allow us to drill two parallel and straight holes in the strut such that they are 1.75″ from the leading edge and exactly 1.5″ apart. Good craftsmanship dictates that these holes be accurately positioned. In fact, the most important thing is that the holes be as “tight” as possible in regard to the bolt fit. A bit of caution here– don’t try for a hard press fit as you will have a monster of a problem dropping the bolts in at the final wing mounting stage. A light sliding fit is perfect.
The positioning of this set of two upper spar attach holes is a bit tricky. SH outlines a system of measurement to be used in order to transfer the desired location onto the spar. This method can be fairly accurate, but can also invite lots of error. I made a small jig that is clamped onto the strut beam and physically picks up on the strut attach arm outer hole using a drill rod. When the strut is slid into position, the hole location is right there on top of the strut. No measuring, no error. The hole location is marked and you are ready to drill as per step 33 of the manual.
Now, here is where I would advise using some caution and a slightly different approach to drilling your strut. The manual has you fit the strut over the strut attach arm, slide in the outboard 3/8″ bolt and then ream out the remaining inboard 11/32″ hole to .3745″. This is fine ONLY IF your strut lines up or “targets” the cage attach point exactly. It must line up with the cage tab and also have no “twist” between the strut attach arm on the wing and the attach tab on the cage. If this is not so, then there will be lateral forces acting on the 11/32″ pin. As the reamer is being advanced through the strut and strut arm assembly, at one point the pin will no longer be able to hold the proper alignment and the assembly will want to come to rest in its natural position. Since your reamer is still in there chomping away at metal, it will now start to OVAL THE UPPER HOLE as the assembly moves into its natural position. This is what happened to me. If I had it to do over again, I would not try holding things in position with the 11/32″ pin (last paragraphs of step 33), but rather carefully drill or ream a 23/64″ hole through the assembly first in order to bring the holes into “natural” alignment. Then follow through with the final ream. Now, hopefully your struts will fall into perfect alignment and all of the above has been wasted reading. But if not-take care!
By the way, I had to machine small eccentric bushings and press them into my struts in order to correct this error. I would not wish this job on anyone.
–Jeff Liot 5141
Wing strut fitting: I want to offer a tip for drilling the holes in the upper portion of the wing struts. It worked just fine for me and it can be done by anyone without any special tools and without any complicated measurements or calculations. The manual describes a fuzzy and error-prone procedure for transferring the holes in the upper strut beam support arm to the struts for drilling. Here is a way that makes it easy:
First notice that the strut beam support members that run between the forward and aft spars are inclined downwards at an angle of around 30°. Also note that the support arm containing the holes that need to get transferred to the strut is clamped between the angled strut beam support members and is oriented perpendicular to the face of the angled members.
Now find a piece of rectangular scrap aluminum about 2 inches wide and 4 inches long. With the wing strut put away somewhere, hold the scrap piece underneath the strut beam support arm with the short side of the scrap piece placed right up against the strut beam support members. Locate a long edge of the scrap so that it is even with the edge of the strut arm nearest the support members. By doing that, you have located the holes to be drilled in the strut with reference to the strut beam support members. Using a a 3/8 and an 11/32 bit, use your fingers to run those bits from the top of the existing holes down onto the scrap piece and–without moving the scrap piece–spin the bits with your fingers to mark the center of those holes.
That done, remove the scrap piece and drill a pilot hole through the scrap right where the drill marked the hole centers.
Now install the wing strut. Adjust the dihedral as necessary and take out whatever small twist you may have experienced. This would also be a good time to make any adjustments you feel are necessary to “fix” whatever angle-of-incidence differences you have–if you are going to fix them.
When the wing is “just right”, then place the scrap ON TOP of the spar. Keep the same orientation you used when you marked the piece and place the short side of the (now pilot hole drilled) scrap up against the upper support beam and slide it over so that the long edge of the scrap is even with the edge of the strut arm nearest the support beam. Those two holes pilot holes that you drilled are now lined up directly above the holes in the support arm and precisely locate where the holes in the strut should be drilled. So using a sharpie, mark through the pilot hole to mark the hole centers on the strut material.
Then set the SHAI drill jig over the marked holes. Use a drill bit to orient the jig so that it sits exactly on top of the marks you made. Then drill the holes as the manual describes. When you finish you will have a perfect alignment with strut beam arm with no fancy measures or error prone calculations, and no special tools…
Try it, you’ll like it. It’s easy to make and use and gives perfect results. It works because the important measurement references here are parallel and perpendicular to everything else. The holes are perpendicular to the arm; the sides of the arm are perpendicular to the hole; the arm is perpendicular to the support beams (looking from the front); and the upper and lower strut support beam are parallel to each other… I know these things; I am a physicist.
–Dennis Douglas, 5220
Stut beam drilling: The manual says to use 3/8″ and 1/4″ reamers or to step drill for the bolts that hold the strut beam together and to the spars. If you do this there is no way you will get a light push fit with the AN bolts. Normally AN bolts are a bit undersized, and following the manual will get a loose fit. I purchased some 0.0025″ undersize reamers for the two holes sizes, and reamed them on my drill press. This got me a nice light press fit for all of the bolt holes. You can easily ream all of the strut beam holes except for the ones that go through the spar using a drill press. In order to get well reamed holes in the spars, drill a hole in a block of hardwood that is a good fit to the shaft size of the reamer, clamp the block to the spar, and ream the holes by hand. If you try to ream free hand the holes will be oversize. Also the manual says to use clecos to hold the strut beam together when drilling and reaming, forget it, use 3/16″ bolts instead, that way nothing will move when you are working on the beam.
–Mike Thompson


