Tips are great when you read them before you go down the wrong path. Here are a few that could save you some headache later as sent by our members.

I have just finished wiring one wing and have a few thoughts on this, some of which may help builders still to construct their wings.
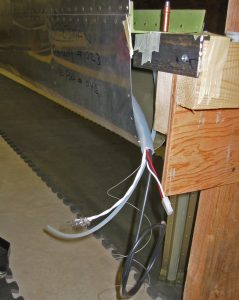
The manual suggest that electric wiring be put along the rear of the wing aft of the rear spar. This is fine except that in practice, its not so straight forward. Initially I used the tooling hole beside the rear spar down low. OK till you come to the flap tracks – no tooling hole and a lot of thick flap tack metal. I got round this by drilling a hole in the block put in during cable rigging to protect the control cables from wear. From there on in the tooling hole again till I headed forward through a lightening hole just outboard of the flap rod, to the auxiliary fuel pump. I then routed forward and through the main ribs in a tooling hole immediately aft of the front spar, down low again, then forward though a lightening hole just before rib 5 and along the nose ribs in front of my auxiliary tanks to the wing tip. Used nylon clamps supplied in the electrical kit to screw to hat sections periodically to secure the wiring (plus some shrink wrap between to keep them tidy), then zip-ties through #30 hole where there were lightening hole to work through in front of the tank. Some spiral wrap was used where I passed over ribs or remotely potential chafe areas..
If you were to continue outboard from the first lightening hole in the tooling hole behind the rear spar, the aileron hinges become an obstacle to get round and this put me off, hence the internal route. I don’t plan to put further wires through at a later date so haven’t routed with this in mind.
However if I was building my wing today, I would take a leaf out of Mr Cessna’s book and put rubber grommets in the tooling hole immediately forward of the front spar (down low). The nose ribs provide simple DIRECT access to the wingtips, with a lightening hole available for the auxillary pump lead. BUT once you have rivetted the nose skins on to the front spar it is TOO LATE.
Firstly, its pretty difficult to drill out the tooling hole once the nose ribs are in place, let along put in the grommet. Secondly, between main ribs 2 and 4 (more or less) there are no lightening holes – no access, hence the need to consider, decide and act prior to rivetting the nose skins on. For those wishing to allow for future wiring, the central lightening hole of the nose rib provides easy and direct access for conduit, as discussed a week or two ago on the GlaStarnet, but again the lack of lightening holes in the central area make retrofitting a little difficult, unless you don’t mind the 6 feet or so being unsecured.
At the wing root end, the wires will need to be run under the forward spar and back to the rear spar to allow for wing folding but this is not too difficult to do neatly. Whilst it seems a bit tough thinking of problems from Vol II when you’re not yet finished with Vol I, this work needs to be done and the wiring run if grommets or conduit is used BEFORE the nose skins, having been rivetted together with the nose ribs in place, are fitted and rivetted.
Don’t forget to run the wiring before fitting the nose skins, or any work towards this routing is for nought. As I say, if I was building my wings again, I would opt for the nose rib rout because of it’s directness and simplicity. But you need to consider what wiring you want and get the wire and grommets (or conduit) in hand. Decisions, decisions!
–Kiwi Pete
Nav light wiring: Prior to close-out, run your nav light wiring in a conduit tie wrapped through the wing. Leave a string installed to fish any wiring you may want to add later.
–Jim Londo


